Australia
The Australian payroll localization covers salary computations for employees, including both employee and employer payroll taxes. It accounts for all local and national regulations.
Before configuring the Australia localization, refer to the general payroll documentation, which includes the basic information for all localizations, as well as all universal settings and fields.
Important
It is not recommended for companies to use the Payroll app for the following business flows:
Income stream types: Foreign Employment Income
Tax treatment category: actors & performers
Death benefits reporting
Reporting obligations for WPN (instead of ABN)
Allowances subject to a varied rate of withholding (such as cents per kilometer allowance and travel allowances)
Contact us to make sure NightPOS fits the specific payroll requirements in Australia.
Apps & modules
Install the following modules to get all the features of the Australia payroll localization:
Name |
Technical name |
Dependencies |
Description |
|---|---|---|---|
Australia - Payroll |
|
|
Provides Australian payroll basics, including employee tax details, salary structures (Basic/Gross/Net), and tax rules. |
Australia - Payroll with Accounting |
|
|
Links payroll and accounting by creating journal entries (per payslip if needed) to record payroll in the company’s books. |
Australia - Payroll with API |
|
|
Provides STP and Super Stream compliance via the Superchoice API, with ATO-approved security controls including MFA, session timeouts, and audit logging. |
General configurations
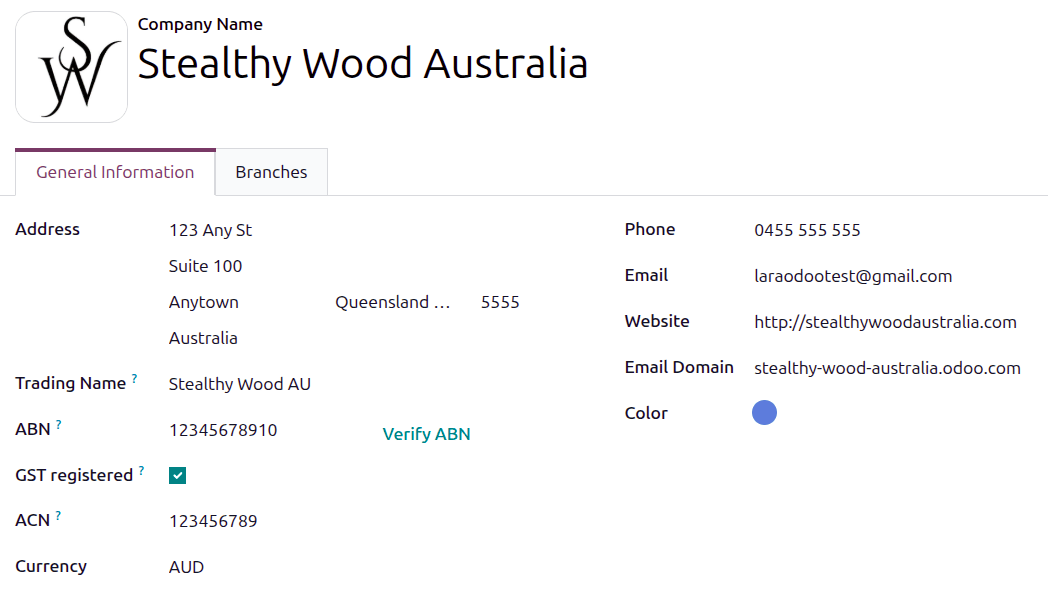
First, the company must be configured. Navigate to . From the list, select the desired company, and ensure the following fields are configured:
Company Name: Enter the business name in this field.
Address: Complete the full address, including the City, State, Zip Code, and Country.
Trading Name: If the business has an unregistered alias (businesses could use these informally in Australia before May 2012), enter it here.
Important
In May 2012, the ASIC required businesses to register all names. From November 1, 2025 on, all unregistered trading names are retired from the ABR, and businesses are required to register their trading name as a business name.
ABN: Enter the company’s eleven-digit ABN in this field. After this is entered, click Verify ABN, to ensure the number is correct.
GST registered: Select this checkbox if the company is registered for Australian GST.
ACN: Enter the company’s nine-digit ACN. This number is issued by the ASIC.
Currency: By default, AUD is selected. If not, select AUD from the drop-down menu.
Phone: Enter the company phone number.
Email: Enter the email used for general contact information.
Website: Enter the company’s web address.
Email Domain: Enter the email domain for the company.
Color: Select a color for the company.
Payroll settings
In addition to configuring the company, some Payroll app settings must be configured. Navigate to , and scroll to the Australian Localization section.
Company Information
Configure the following fields in the Company Information section:
Branch Code: Enter the six-digit BSB code. This identifies the specific bank and branch for payroll transactions.
Tip
The Branch Code can be found in the ATO portal. In NightPOS, only the numeric value is relevant. For example,
Activity statement 002would translate in NightPOS as 2 (002 = 2).Withholding Payer Number: If available, enter the eight or nine-digit WPN issued by the ATO. This is for companies not entitled to an ABN.
Registered for Working Holiday Maker: Select this checkbox if the company is registered for the WHM program. This indicates the company is registered with the ATO to withhold the correct taxes for employees working in Australia with an eligible visa, for a period of less than 12 months.
Registered for PALM Scheme: Select this checkbox if the company is registered for the PALM scheme, which allows the company to hire employees from ten different Pacific island nations.
SuperStream and Single Touch Payroll
Configure the following fields in the SuperStream and Single Touch Payroll section:
Payroll Mode: Using the drop-down menu, select whether SuperStream and STP are in Testing mode, or Production (live) mode.
Registration Status: This field is unable to be modified, as it displays the current registration status for the SuperStream and STP payroll.
Important
NightPOS is compliant with SuperStream and Single Touch Payroll Phase 2. Before registering in Production mode, we recommend consulting with NightPOS’s sales or support teams to ensure it aligns with your company’s specific payroll requirements.
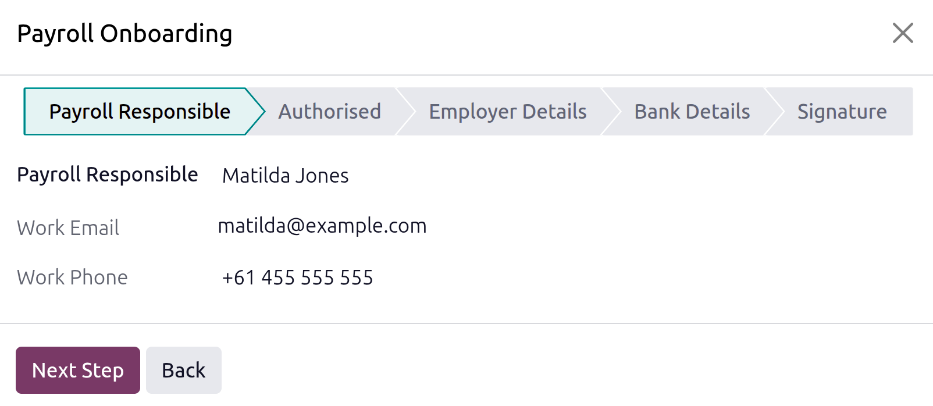
To complete the registration process, click Start Payroll Onboarding, and a Payroll Onboarding pop-up window loads. Select the Payroll Responsible user using the drop-down menu. Once selected, the Work Email and Work Phone fields are autopopulated with the user’s contact information, and cannot be changed.
Note
Only users of the database can be selected for the Payroll Responsible.
Next, click Next Step, and the status changes to Authorised, and displays the question Are you authorised to register for this service on behalf of your employer? Click Yes to confirm, then click Next Step.
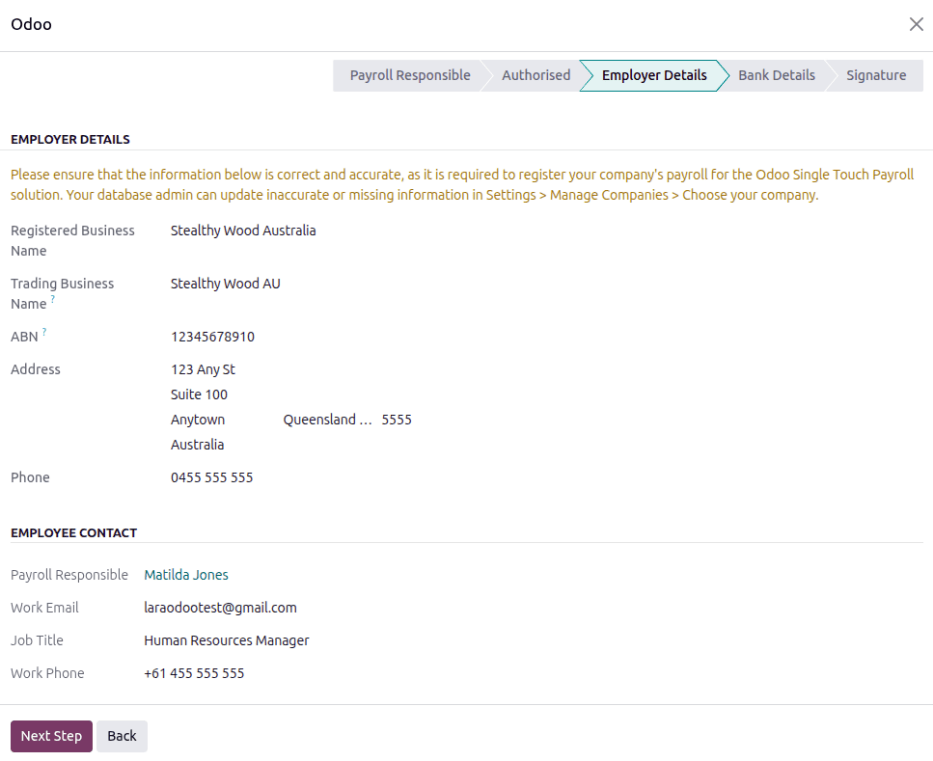
The status changes to Employer Details, and displays the contact information for both the company and the selected payroll responsible. Ensure the Employer Details and Employee Contact are correct on the form.
If any information needs to be updated, exit the form and update the company or employee information in the Settings app or Employees app, then return to the Payroll settings page. Click the Start Payroll Onboarding button, and the pop-up window loads to the Employer Details again.
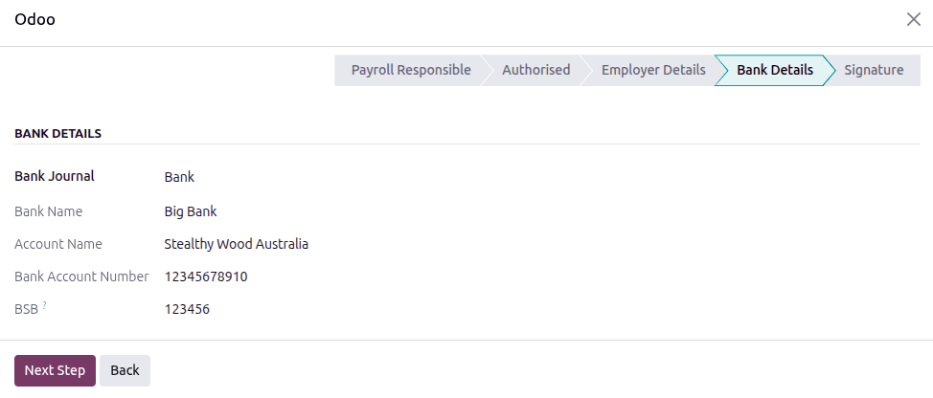
When the displayed information is correct, click Next Step and the status changes to Bank Details. Using the drop-down menu, select the Bank Journal for payroll. After a journal is selected, the Bank Name, Account Name, Bank Account Number, and BSB fields are populated with the selected bank journal’s details, and cannot be modified. If any changes are needed, exit the form and update the information for the journal in the Accounting app.
When the Bank Details are correctly filled out, click Next Step, and the status changes to Signature. Two PDFs appear, NightPOS Terms & Conditions, and SuperChoice FSG PDS DDA. Download and read the two PDFs, then select the two checkboxes next to the I have read and signed (PDF name) lines.
Finally, click Register to complete the registration.
Employees
Every employee being paid must have their employee profiles configured for the Australia payroll localization. Additional fields are present after configuring the database for Australia.
To update an employee form, open the app and click on the desired employee record. Ensure a Work Email and Work Phone are configured on the employee form, and configure the required fields in the related tabs.
Work tab
Enter the Department, Job Position, and Job Title, in the Work section.
Enter a Work Address for the employee in the Location section.
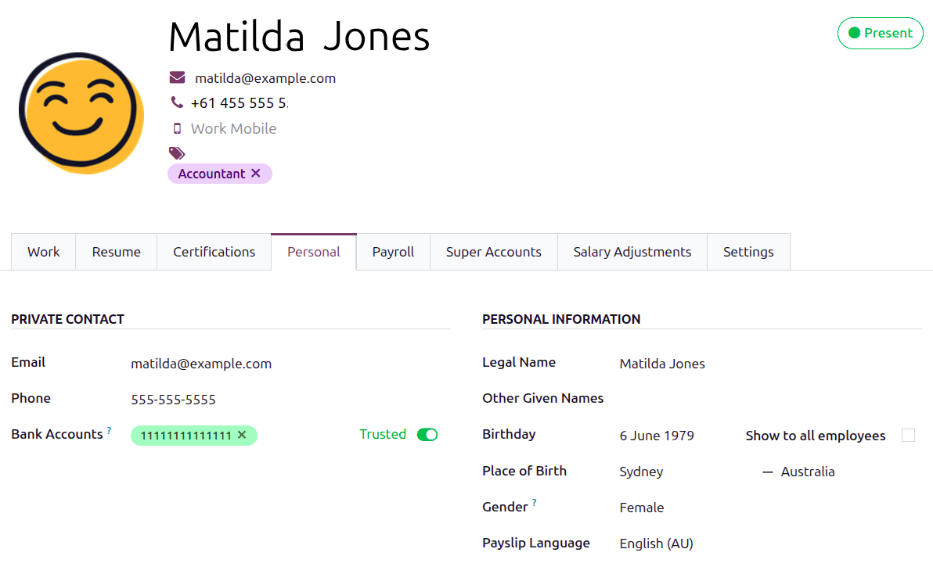
Personal tab
Ensure the employee has a minimum of one trusted bank account listed in the Bank Accounts field in the Private Contact section.
These accounts are used to pay the employee. Payroll cannot be processed for employees without a trusted bank account. If no trusted bank account is set, a warning appears on the Payroll dashboard and an error occurs when attempting to run payroll.
Ensure the following fields are configured: Email, Phone, Legal Name, Other Given Names, Birthday, Gender, Private Address, Marital status, and Dependent Children.
Payroll tab
Fill out all the information regarding employees’ contracts, residency status, tax treatments, deductions, etc. in the sections below.
Contract overview section
This section holds information that drives salary calculations.
Keep the Salary Structure Type set to Australian Employee and Working hours set to AU Standard 38 hours/week. This structure covers all of the ATO’s tax schedules.
If using the Attendances or Planning app, select the Work Entry Source to define how working hours and days are accounted for on the employee’s payslip.
Working Schedule: Work entries are automatically generated based on the employee’s working schedule, starting from the contract’s start date.
Example
An employee works 38 hours a week, their contract begins on 01/01, today’s date is 16/01, and the user generates a pay run from 14/01 to 20/01. The working hours on the payslip will be automatically calculated to be 38 hours (5 * 7.36 hours) if no unpaid leave is taken.
Attendances: Work entries are only generated after clocking in and out of the Attendances app. Note that attendances can be imported.
Planning: Work entries are generated from planning shifts in the Planning app.
Important
Timesheets do not impact work entries in NightPOS. If timesheets need to be imported in NightPOS, import them by navigating to instead.
Ensure the following fields are configured:
Select Fixed Wage for full-time and part-time employees.
Select Hourly Wage for casual workers. This allows for adding a
Casual Loadingpercentage.Tip
Set a default Wage Type in the salary Structure Type to configure employees in bulk. If needed, the default can be overridden on individual employee records if exceptions are needed.
Wage: Enter the wage, and select the corresponding time period. The following options are the only pay run frequencies accepted by Australia: Daily, Weekly, Fortnightly (bi-weekly), Monthly, and Quarterly.
Wage / Period: Assign a wage to the contract according to the pay frequency. On payslips, the corresponding annual and hourly rates will be computed automatically.
Employee Type: Select the type of employee.
Contract Type: Determines how the employee is paid and classified, such as Permanent, Temporary, Apprenticeship.
Pay Category: Select Australia: Employee for this field. This defines when the employee is paid, their default working schedule, and the work entry type it applies to.
Schedule section
Work Entry Source: Defines how work entries are generated for payroll during the specified pay period. The options are:
Working Schedule: Based on the employee’s assigned working schedule (e.g., 40 hours per week).
Attendances: Based on approved checked-in hours in the Attendances app.
Planning: Based on scheduled shifts in the Planning app.
Working Hours: Using the drop-down menu, select the default work schedule. This is particularly important for employees available to receive overtime pay (typically hourly employees, not salaried). The common selection is AU Standard 38 hours/week.
General section
Regular Pay Day: Day of a week to process the payments if relevant.
Report in BAS - W3: Enable this to add PAYG withholding amounts in BAS section W3 instead of W2. Refer to the ATO’s web page on PAYG withholding for more information.
Personal information section
Non-resident: Check this box if the employee is not a legal resident of Australia.
Tax-free Threshold: Check this box if the employee is claiming tax-free threshold.
TFN Status: Using the drop-down menu, select the employee’s declaration.
Tax File Number: Enter the employee’s tax file number.
Previous Payroll ID: This is only available in Debug Mode. This should be used if the employee has payroll records in a previous system and you want to maintain payslip continuity in NightPOS.
Tax and contributions sections
Employment Type: Select the kind of employment the employee has. This affects tax calculations. Options are Full time, Part time, Casual, Labour hire, Voluntary agreement, Death beneficiary, or Non-employee.
Income Stream Type: Select where the employee is receiving their pay from. The typical employee is Salary and wages, however some other circumstances may require a different selection.
Tax Treatment Category: The STP Phase 2 report includes a 6-character tax treatment code for each employee. The tax treatment code is an abbreviated way of explaining the factors that can influence the amount withheld from employees. The STP solution automates the reporting of these codes and ensure that the tax treatment code reported is valid. Even though the creation of this code is automated, it is still part of the STP report, and it is important to understand what it means. For more details, check the ATO website on how to report employment and tax information through STP Phase 2.
HELP / STSL: Click this checkbox if the employee is a HELP loan or STSL recipient.
Medicare Variation Form and Medicare levy surcharge: Click Upload your file to upload the filled form and select the appropriate surcharge if applicable.
Deductions, offsets, and withholding section
Child Support Deduction: The amount that has to be deducted every pay period, subject to PEA.
Child Support Garnishee Amount %: The percentage of pay that is legally withheld and paid towards child support.
Withhold for Extra Pay: An amount that has to be deducted every pay period, subject to PEA.
Withholding Variation: A formal adjustment to the standard tax withholding rate based on specific circumstances (e.g. financial hardship or ATO approval).
Additional Withholding Amount: Additional amount will be withheld from the employee’s salary after PAYG withholding (Schedule 14)5.
Leave loading / workplace giving section
Eligible for Leave Loading: Check if the employee is eligible for leave loading.
Workplace Giving Employee: Set the amount to be deducted.
Salary Sacrificed Workplace Giving: Set the amount to be salary sacrificed (e.g., receiving a benefit instead of a deduction).
Super contributions section
Extra Negotiated Super %: Set the additional percentage amount to be contributed on top of the super guarantee.
Extra Compulsory Super %: Set the additional percentage amount to be contributed as per industrial agreements or awards obligations.
Salary sacrifice section
Salary Sacrifice Superannuation: Allows employees to sacrifice part of their salary in favour of RESC account, which is an Australian retirement account.
Salary Sacrifice Other Benefits: Allows employees to sacrifice part of their salary towards some other form of benefit. Refer to the ATO’s web page on Salary sacrificing for employees for more information.
Note
Salary sacrificing for other benefits does not affect FBT reporting.
Super accounts tab
A super account is the term for an Australian retirement savings account. This tab houses the employee’s various retirement accounts, or super funds.
Note
If an employee has an Extra Negotiated Super, Extra Compulsory Super, or Salary Sacrifice Superannuation, these configuration can be found under the Payroll tab, in the Super Contributions section.
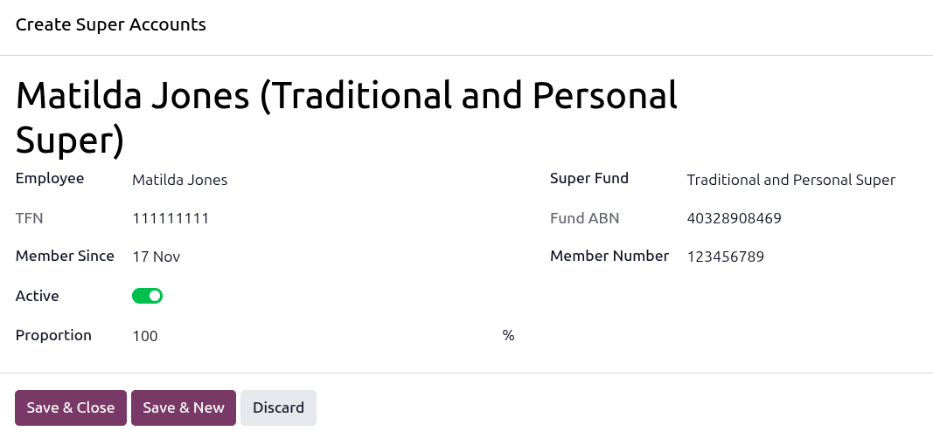
Click Add a line. In the Create Super Accounts pop-up window, enter the following information:
Employee: Ensure the employee is selected in this field.
TFN: The TFN entered in the Payroll tab of the employee form populates this field, and cannot be modified.
Member Since: By default, the current date populates this field. Select the date the employee created the super fund.
Active: Enable this option if the account is active (this is the likely scenario).
Proportion: Enter the percentage amount being added to the account. By default, the field displays
100.Note
Use the Proportion field if an employee’s contributions should be sent to multiple funds at a time.
Super Fund: In the drop-down menu, select the type of account associated with the super fund.
Fund ABN: This field is autopopulated with the selected Super Fund ABN, and cannot be modified.
Member Number: After selecting a Super Fund, this field appears. Enter the member number for the employee’s super fund account.
Tip
NightPOS comes with pre-installed and updated Super funds, but self-managed super funds (SMSF) can be added by navigating to . Manage all super accounts by navigating to .
Salary adjustments tab
If the employee has pay allowances (e.g., laundry allowance, travel allowance, cents per km allowance, transport allowance), configure them in the Salary Adjustment tab.
STP Responsible Employee
One employee responsible for STP must be nominated. Navigate to the Employees app, and select the desired employee. Ensure the following fields are configured on their employee profile: Name, Work phone, Work email, and Job Title.
Bank account and bank journal
The bank account that direct debit payments are drafted from via the clearing house must be configured.
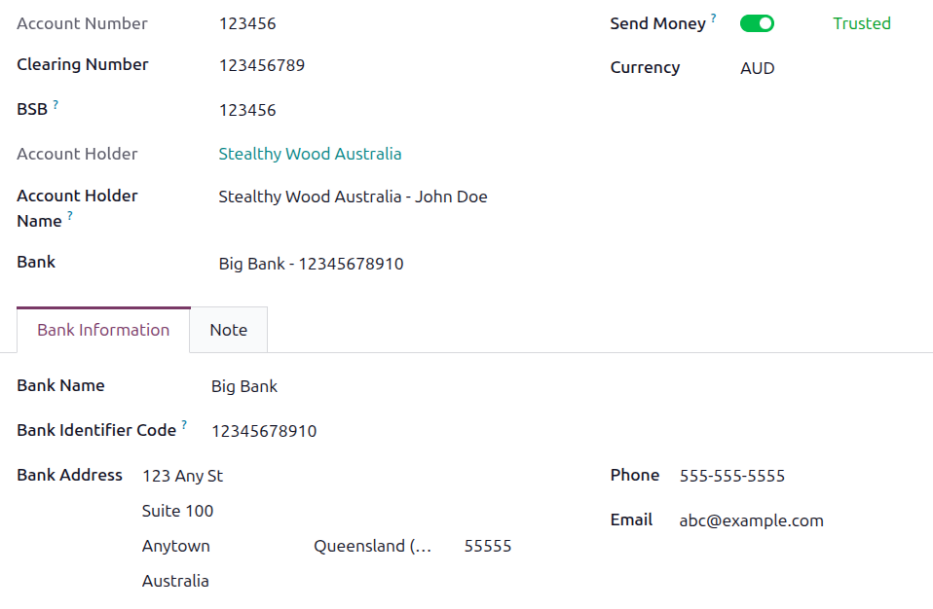
Navigate to . Click New to add a bank account, and a Bank Accounts form loads.
Configure the form, ensuring the following fields are populated:
Account Number: Enter the bank account number in this field.
Clearing Number: Enter the clearing number in this field.
BSB: Enter the Bank State Branch code in this field.
Account Holder: Using the drop-down menu, select the corresponding Contact app record for the account holder, typically the company.
Account Holder Name: The selected Account Holder populates this field by default. Make any necessary modifications.
Bank: Using the drop-down menu, select the bank the account is under. Once selected, a Bank Information tab appears, containing the various bank information. Make any desired edits to this tab.
Send Money: Ensure this toggle is set to Trusted.
Currency: Set this field to AUD.
Then, navigate to , and select the corresponding bank journal. Ensure the Bank Account number in the Journal Entries tab is the same as the bank account configured above.
Important
NightPOS takes direct debits from this account to pay employee’s superannuation.
Payroll configuration
Several sections within the Payroll app also install a salary structure, structure type, rules, and parameters specific to Australia.
Salary structures & structure types
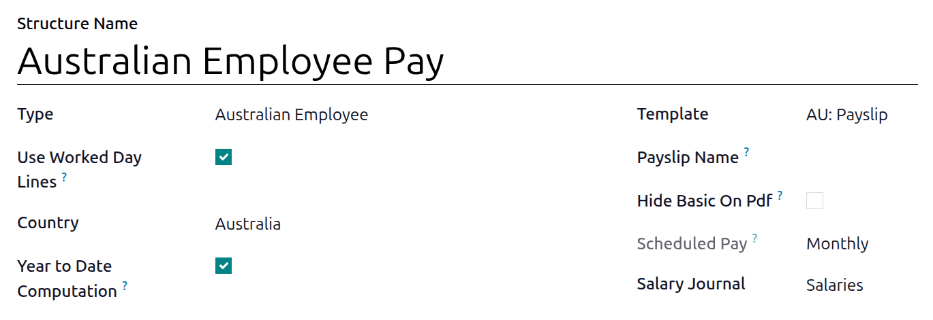
When the l10n_au_hr_payroll module is installed, a new Salary Structure gets installed, Australian Employee. This structure includes one Structure Type, Australian Employee Pay.
The Salary Structure contains all the individual salary rules that informs the Payroll app how to calculate employee payslips.

Salary rules
To view the salary rules that inform the salary structure what to do, navigate to and expand the Australian Employee group to reveal the Australian Employee Pay structure type. Click Australian Employee Pay to view the detailed salary rules.
Rule parameters
Some calculations require specific rates associated with them, or wage caps. Rules Parameters are capable of listing a value, either a percentage or a fixed amount, to reference in the salary rules.
Most rules pull information stored in the parameters module to get the rate of the rule (a percentage) and the cap (a dollar amount).
To view rule parameters, navigate to . Here, all rule parameters are displayed with their linked Salary Rules, which can be accessed. Review the parameters associated with a rule by looking for the Name of the rule, and make any edits as needed.
Important
NightPOS adds updated rule parameters for the current calendar year. It is not recommended to edit rule parameters unless a national or local parameter has changed, and is different from the rule parameters created by NightPOS. Check with all local and national regulations before making any changes to rule parameters.
Payroll onboarding
Once the company, the STP responsible employee, and the bank journal for direct debit are configured, navigate to to start the onboarding process.
Scroll to the Australian Localization section, and under SuperStream and Single Touch Payroll, select the Payroll Mode. Choose Production for a production database with a valid subscription code, or otherwise, select Testing. Then, click the Start Payroll Onboarding button, and a Payroll Onboarding pop-up window loads.
Important
It is strongly recommended to test payroll on the testing database prior to configuring the production environment, as any payroll processed in the production database will be submitted directly to the ATO.
On the Payroll Responsible stage, select the STP responsible employee in the Payroll Responsible field, then click the Next Step button.
On the Authorised stage, click the Yes option for the question Are you authorised to register for this service on behalf of your employer, then click the Next Step button.
On the Employee Details stage, review the business details and ensure they are all correct, then click Next Step.
On the Bank Details stage, select the company’s Bank journal for direct debit, then click Next Step.
On the Signature stage, read the following PDF’s:
NightPOS’s Terms & Conditions
SuperChoice FSG PDS DDA
After the documents have been reviewed, click the two check boxes attesting that the documents have been read, then, click the Register button.
Important
Read the provided documents carefully before signing.
Lastly, NightPOS will provide advice on how to proceed in case the company needs to switch from another STP software to NightPOS.
On the Import YTD Balances pop-up window, select Zeroed Previous Payroll if the previous payroll system has been zeroed out, or if there is no previous payroll system. Next, enter the Previous BMS ID in the corresponding field.
Note
BMS ID is the Business Management System Identifier for your organisation in the payroll system. This is important when transitioning from other payroll systems to NightPOS, as it ensures employees maintain continuous year-to-date records on their payslips and ATO Portal.
Enter the Fiscal Year Start Date in the corresponding field, then click the Transfer and Generate YTD button.
Importing YTD balances
To import the year-to-date balances, navigate to .
After importing the YTD balances from the previous software, the ATO needs to be notified of the change of BMS ID and payroll IDs. This step does not apply for strategy 1.
To do so, after importing YTD balances, navigate to , and submit the update event created for this purpose.
Once the update event submitted to the ATO, pay runs and payslips can be created for employees.
Run Australian payroll
Before running payroll, the payroll officer must validate employee work entries to confirm pay accuracy and catch errors. This includes checking that all time off is approved and any overtime is appropriate.
Work entries sync based on the employee’s contract configuration. NightPOS pulls from the assigned working schedule, attendance records, planning schedule, and approved time off.
Any discrepancies or conflicts must be resolved, then the work entries can be regenerated.
Once everything is correct, draft payslips can be created individually or in batches, referred to in the Payroll app as pay runs.
Important
In Australia, individual payslips (not part of a pay run) are considered out-of-cycle runs. The same payslip rules apply, but the way individual payslips are submitted to the ATO in the framework of STP is slightly different.
Adding an out-of-cycle payslip to an existing batch is not recommended.

Note
To reduce payroll processing time, payroll officer typically handle payslips in batches. These batches can be grouped by wage type (e.g., fixed salary or hourly), pay schedule (weekly, bi-weekly, or monthly), department (direct cost or administration), or any other structure that suits the company.
Create a pay run
First, create a pay run for the desired time period. Navigate to and click New. Select the desired Salary Structure, Pay Schedule, and time Period, then click Continue.
Select the employees to create the pay run for, then click Select.
Tip
Employees on a pay run can be filtered by Salary Structures.
Work entries are directly linked to the time an employee worked. They can be created in the following ways:
Automatically, using the employee’s work schedule.
Automatically, using the Attendances app
Automatically, after publishing planned shifts.
Manually, via import.
To manually upload work entries, navigate to , and view the data in a list. Next, click the (Actions) icon and select Import Records.
Tip
Alternatively, use the built-in Timesheets app to record hours. These can then be exported, adjusted slightly (with a few field changes), and re-imported as work entries.
Important
Currently there is no integration with NightPOS’s Timesheets app.
Generate payslips
Payslips can be generated in two ways:
Pay Runs: The recommended method for Australia.
Off-Cycle Payslips: Mainly used for termination payslips, or other payments outside of a pay cycle.
There is no limit to the amount of payslips that can be created in one pay run.
After creating a pay run, one payslip is created per employee in the Waiting stage, which can be reviewed and amended before validation.
Note
In the future, payslips that are not related to hours worked should also be handled using off-cycle payslips.
Payslips
On the payslip form view, there are two types of inputs:
Worked days: Computed based on the work entry source set on the employee’s contract. Work entries can be configured according to different types: attendance, overtime, Saturday rate, Sunday rate, public holiday rate, etc.
Salary inputs: Individual payments or amounts of different types (allowances, lump sums, deductions, termination payments, leaves, etc.) that have little to do with the hours worked during the current pay period. The previously configured salary attachments are simply recurring other inputs attached to a contract.
Under the Salary Computation tab, NightPOS automatically computes payslip rules based on employees, contracts, worked hours and salary input types.
The salary structure Australian Employee has 35 payslip rules that automatically compute and dynamically display according to the payslip inputs.
Example
The following rules apply for the pay period in the accompanying payslip:
Basic Salary: The pre-sacrifice gross salary (total contract amount before any deductions).
Ordinary Time Earnings: Amount to which the super guarantee percentage needs to be applied
Salary Sacrifice Total: includes the $150 sacrificed to superannuation
Taxable Allowance Payments: includes the $10 allowance (cents per KM in this case)
Taxable Salary: Gross salary amount minus non-taxable amounts
Salary Withholding and Total Withholding: The total tax amounts to be withheld from the taxable salary and remitted to the ATO.
Net Salary: The “take-home pay” or the employee’s actual wage after all taxes and deductions.
Concessional Super Contribution: In this scenario, the amount sacrificed to superannuation, payable to the employee’s super fund in addition to the super guarantee
Super Guarantee: This is computed as 12% of the ordinary time earnings amount
Confirming payslips
Once all payslip data is deemed correct, click Create Draft Entry on the pay run. This can also be done payslip by payslip for control reasons.
This has several impacts:
The employee receives their payslip via email + portal accessibility.
Marking the batch and its payslips as Done.
Creating a draft accounting entry per payslip or one entry for the whole batch, depending on the payroll settings. At this stage, accountants can post entries to affect the balance sheet, P&L report, and BAS report.
Preparing the STP submission (or payroll data to be filed to the ATO as part of STP compliance). This needs to be performed by the STP Responsible user, defined under .
Preparing super contribution lines as part of SuperStream compliance. This needs to be done by the HR Super Send user selected under .
Impact on accounting
Four accounts from the Australian CoA are included with the payroll localization:
611000 Salaries & Wages230100 Employee Payroll Taxes230200 Employer Payroll Taxes230000 Salary Payable
Note
The CoA configuration is done by default when a company is located in
Australia. The account codes and names can be edited to suit the company’s needs. If there is no
CoA account associated with a salary rule (used in a salary
structure), NightPOS uses the account Salary Expenses to create the journal entry, regardless of
the nature of the move.
Once payslips are confirmed, a draft journal entry per payslip is created, in the Salaries journal.
The level of detail in a payslip’s linked journal entry is determined by how the employee settings are configured and accounts on the salary rules.
Note
The following salary rules that impact accounting:
Fees and Deductions
Total Withholding
Child Support Total
Expense Reimbursement
Net Salary
Concessional Super Contribution
Super Guarantee
Once the journal entry is posted, predefined accounts will impact the company’s balance sheet (PAYGW, wages, and superannuation liabilities) and profit & loss report (wages and superannuation expenses). In addition, the employee’s gross wage and PAYG withholding will update the BAS report for the relevant period (see Tax Grid: W1 and W2). Accounts can be adjusted to the company’s chart of accounts.
Closing the BAS
Closing the BAS report now includes payroll sections (W1 to W5)
Most Common:
W1: Total salary, wages and other payments
W2: Amounts withheld from salaries or wages and other payments shown at W1
W5: Total amounts withheld (W2 + W4 + W3).
Special cases
W4: Amounts withheld where no ABN is quoted (NOT a payroll tax! You can record W4 amounts on vendor bills by using the No ABN tax)
W3: Other amounts withheld (excluding any amount shown at W2 or W4). To use it, select the Report in W3 checkbox in the employee’s record, in the Payroll tab.
Note
For Consolidated payroll accounting entries, navigate to and enable Batch Account Move Lines.
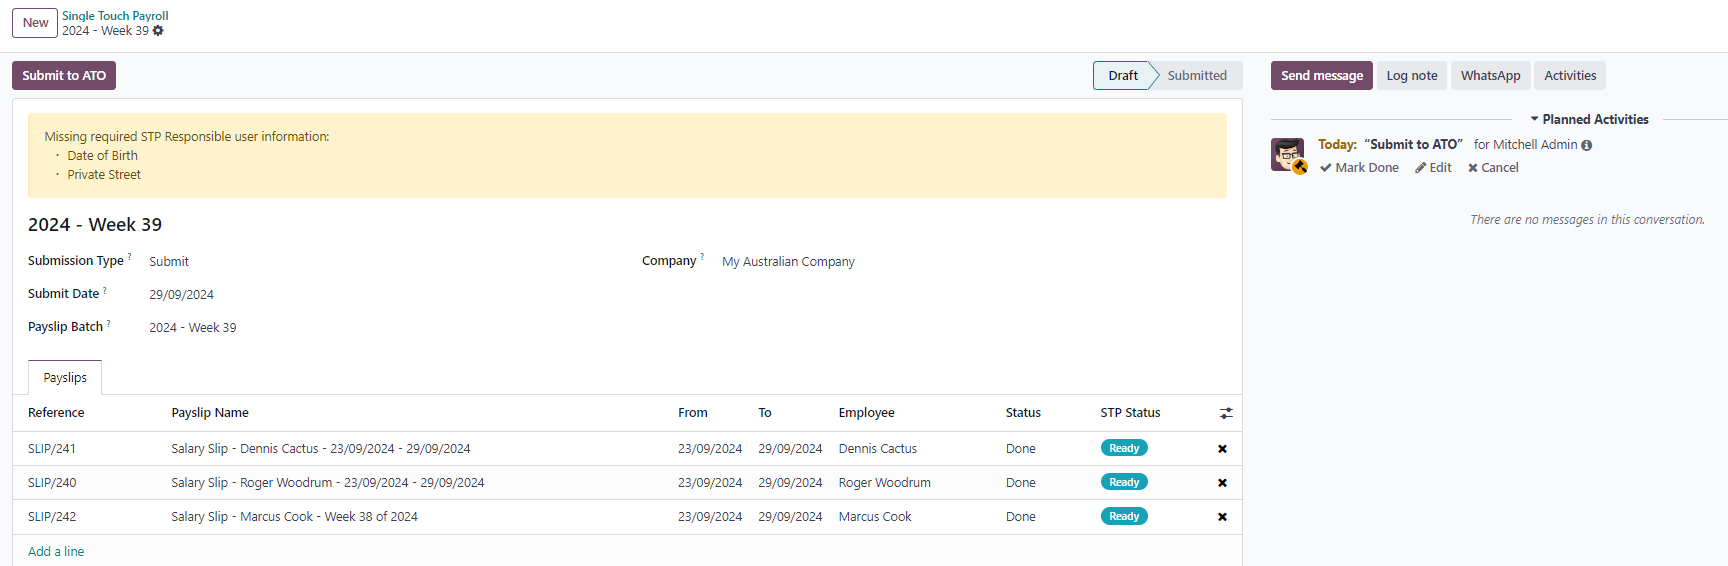
Submit STP files to the ATO
As per ATO requirements, STP submissions for a pay run must be done on or before the payday. For this reason, submit STP data to the ATO before proceeding with payment. To submit the data, click Submit to ATO on the payslip or pay run.
Tip
A warning message appears if important information is missing.
On the STP record for the pay run, a few useful information is displayed:
A warning message if important information is missing.
An automatically generated activity for the STP responsible user.
A summary of payslips contained in this pay run, auditable from this view.
Always test the submission before submitting.
Once the STP record is ready, click Submit to ATO, then read and accept the related terms and conditions.
Pay, refund, and print payslips
When payslips are submitted to ATO you will see 2 options:
Mark as Paid: Click this if you are not using NightPOS for accounting (this serves as an internal note that the pay run was paid).
Paid: Click this if you want to generate a payment file for later reconciliation. Here, you can also select ABA Credit Transfer as the payment method. The ABA file can be downloaded directly from the pay run.
Super contributions
Superannuation payments to employees’ super funds must be processed at least once per quarter, or more frequently when preparing for Payday Super.
There are two ways to access Super Contribution records:
Navigate to .
Click the Super Contribution smart button on the individual payslip.
Super Record Information includes:
Bank Information (used for direct debit processing)
Payslip Lines associated with the contributions
Contribution Amounts for each employee
Reporting Status
Direct Debit Status
Fund Update Banner (to highlight any required updates or issues)
Paying super
Lock the super record. Navigate to and lock the record. Once locked, further contributions create a new super record, just like replenishing new products in the Purchasing app create a new RFQ.
Register the super payment. This will create a payment record in NightPOS, and authorise the clearing house to collect the contributions via direct debit.
Wait for the following statuses to update:
Direct debit status (payment status from the employer to the clearing house)
Fund payment status (payment status from the clearing house to the super funds)
Payment status (payment status of the entire transaction)
Reconcile. You can now reconcile the payment with the bank statement.
Note
As of July 1, 2026, Australian businesses will be required to pay super at the same time as salary & wages. This Governmental initiative is called Payday Super. Find more information on the ATO website .
Special cases
The following are common situations and their resolutions:
What if I need to cancel my super payment?
Navigate to . Find the entry to cancel and click Cancel. The chatter log will display information regarding the Direct Debit Status, identifying whether it is a cancellation or a refund.
What if my direct debit payment fails?
On the Super record, the Direct Debit Status will be marked as Failed. Either resubmit or cancel the super transaction
What if one of the fund payment fails?
On the Super record lines, the Fund Payment Status will be marked as Failed. Either resubmit or cancel the super transaction.
Payroll links to other apps
The following apps integrate with the Payroll app, and require specific configurations or considerations.
Time Off
Logging time off of any kind replaces the employee’s work entries. This takes place because time off types are linked to work entry types.
Navigate to . For each type, configure the following two fields under the Payroll section:
Work Entry Type: Defines which work entry is selected on the Worked Days table of the payslip.
Unused Leave Type: Choose between General Leave, Long Service, or Unpaid at Termination. If Unpaid at Termination is selected, the remaining leave balance for this time off type will not show up as an entitlement at the time of termination.
Expenses
- Navigate to and enable the option
Reimburse in Payslip.
When an employee on the payroll submits an approved expense to be reimbursed, it can be reimbursed in two ways:
If the expense is to be reimbursed outside of a pay run, click Post Journal Entries. The payment must be made manually.
If the expense is to be reimbursed as part of the next pay run, click Report in Next Payslip instead.
The expense will be visible under Payslip Salary Inputs, Salary Computation, and the printed payslip.
Attendances
On the employee’s record, set the Work Entry Source field to Attendances.
Work entries will be created as soon as the employee signs in and out via the Attendances app.
On the payslip, only the actual time worked will be displayed in the worked days and hours table.
Planning
On the employee’s record, set the Work Entry Source field to Planning.
Work entries will be created as soon as planning shifts are published.
On the payslip, only time worked will show in the worked days table.
Casual workers
Casual employment is specific to Australia and New Zealand.
An employee is considered casual if, at the time they commence employment, one of the following applies:
No firm commitment
There is no firm advance commitment to ongoing and indefinite work, taking into account various relevant factors; and work schedules cannot be reliably used for casual employees in NightPOS due to the absence of a fixed or ongoing commitment to work.
Instead, it is recommended to use the Planning or Attendances apps to record actual work entries.
Note
The Working Hours field on an employee record can be left empty for casual employees.
Entitled to casual loading
They are entitled to receive a casual loading or a specific casual pay rate under an award, registered agreement, or employment contract.
A casual loading rate can be applied to employees who are paid on an hourly basis, rather than a fixed wage, which is intended for full-time or part-time staff.
Penalty rates
In addition to casual loading, NightPOS allows you to apply penalty rates based on the timing of a shift (e.g., Saturdays, Sundays, Public Holidays).
To implement this, create a separate work entry type for each penalty category.
Overtime
Using the same field as for penalty rates, you can apply an additional percentage for overtime hours.
For each overtime type, create a separate work entry type. Unlike penalties, overtime is different because casual loading does not apply to overtime hours.
Managing casual worker rates
Configure all work entry types with the appropriate penalty and overtime rates.
Record work entries using the Attendances or Planning apps.
Manually update work entries daily or weekly in the Attendance app, assigning them to the correct work entry type.
If manual updates are not suitable, a practical alternative is to import work entries from a spreadsheet.
You can view this information on the employee’s payslip. There are two active smart buttons that allow for quick access to work entries, to make adjustments and attendance records as well.
Terminate employees
Employees can be terminated by going to . The following fields must be completed:
Contract End Date: Once the termination is validated, this date is added to the contract automatically, and marks the contract as Expired when the date has been reached.
Cessation Type Code: A mandatory field for the ATO’s STP reporting.
Termination Type: The type of redundancy (genuine or non-genuine) affects the computation of unused annual and long service leave withholding.
The Final payslip will be marked as final pay. Besides normal wages & benefits, it will contain unused leaves, auto-calculated by NightPOS.
On top of these payments, you can add ETPs. These can be of 2 types: Excluded ETPs & Non-excluded ETPs. These are simply taxed differently, and cover different types of employment scenarios. They also depend on the type of redundancy. Find more information on the ATO website .
Note
Annual leaves will be taxed as per ATO schedule 7. ETPs will be taxed as per ATO schedule 11.
Advanced configurations
In some cases, if there is a need to add more inputs to an employee’s salary that are not covered by the default input type, other input types can be configured or created.
Other input types
To edit or create another input types, navigate to . To modify an existing type, click on the rule and make the desired changes. To create a new input type, click New, then fill out the Payslip Other Input Types form.
Important
A total of sixty-three other input types are related to the Australia payroll localization. It is not recommended to use these other input types, since they cannot be used in the frame of STP. These can be archived or deleted.
On each input type being used, ensure the following fields are populated:
Payment Type: Select the classification for the input types using the drop-down menu. The default options are:
ETP: The input is an ETP. These are either considered excluded or non-excluded. Refer to the ATO web page on ETP components taxation.
Allowance: The input is a separate amount paid to employees in addition to their salary and wages. Some of these allowances are mandated by modern awards, such as laundry, transportation, etc.
Important
Contact NightPOS if planning to use allowances subject to varied rates of withholding (such as cents per kilometer or travel allowances) to ensure NightPOS currently covers the particular business case.
Note
As of NightPOS 18, some allowances, such as Laundry, which is used for approved uniforms, are managed by two other inputs: one to lodge the amount paid up to the ATO limit, and the other one to lodge the amount exceeding the ATO limit. This is necessary for NightPOS to compute PAYGW correctly. Some businesses may require to shift the reporting of an allowance from OTE to Salary & Wages depending on the employee. In this case, the input type must be duplicated and reconfigured from an existing other input type. For example, Work-Related Non-Expense: Allowance to compensate for specific work, activities, disabilities, skills or qualifications is OTE by default.
Deduction: The input is a deduction such as union fees and child support.
Leave: The input is a leave-related other input that does not pertain to a single pay period (lump sum, cashing out leaves while in service, unused leaves, etc.).
Lump Sum: This input is a return to work and lump sums (for back payments).
Other: The input is another payment with its own specific logic.
PAYGW Treatment: This field affects how NightPOS withholds tax for the input type. Using the drop-down menu, select either: Regular, No PAYG Withholding, or Taxed above ATO limit
Superannuation Treatment: Using the drop-down menu, select if the input is considered a OTE (one-time earning), Salary & Wages, or Not Salary & Wages.
STP Code: This field is only visible in developer mode. This field tells NightPOS how to report the gross value of the payment to the ATO. It is not recommended to change the value of this field if it is already populated by default.
Is OTE: This field determines whether time spent in this category can be considered ordinary time earnings, meaning that the superannuation guarantee rate will apply (e.g., regular attendance, paid leave, etc.).
Penalty Rate: This field is used to determine the percentage of penalty that applies to time spent in this category. It is important to configure the penalty rate that applies in the state or industry according to the type of work (e.g., Saturday rate, Sunday rate, overtime rate, etc.).
Close Payroll
If there are no errors, payroll is completed for the pay period.
Reports
The Australian localization contains several reports unique to Australia, which provide information on superfund contributions, single touch payroll, STP Finalisation, and the ability to terminate employees.
STP Finalisation
The fiscal year in Australia ends on June 30th, but STP finalisation declarations are due by July 14th. These can be done in one single report for all employees, or individually.
EOFY finalisation
To finalize the fiscal year’s STP, navigate to , and a Finalise Payroll pop-up window loads.
The Company, ABN, and Branch Code are populated from the company information.
Configure the following fields on the form:
BMS ID: Enter the company’s BMS ID, issued by the ATO.
EOFY Declaration: Select this checkbox to indicate the finalisation is for the entire fiscal year (not an individual finalisation). Once selected, the name of the report changes to
EOFY Finalisation - YYYY/YY.Finalisation: Select this checkbox to indicate this is a finalisation and not an amendment.
Date Start: This field displays
1 July, by default.Date End: If EOFY Declaration is selected, this field displays
30 June
YYYY
Fiscal Year: The current fiscal year populates this field.
Responsible User: Using the drop-down menu, select the user responsible for this report.

Both active and terminated employees to finalise are displayed in the Employee Finalisation tab. Ensure all balances for all employees are correct. Once verified, click Submit to ATO to create the report and submit it.
Employee payment information changes to Tax ready on their online income statement, after the end of the financial year.
Individual finalisation
Employees can be individually finalised during the year. This can be useful when:
A one-off (off-cycle) payment is made after a finalisation is sent to the ATO.
After an employee is terminated during the year.
To create an individual finalisation, navigate to .
Configure the top-half of the form in the same manner as the typical annual finalization, but do not select the checkbox next to the EOFY Declaration. Leaving this unchecked displays a Deadline Date field. This is populated with the current date, by default. Adjust this date if needed.
Next, manually add the employees to be finalised by clicking Add a line in the Employee Finalisation tab, and selecting the employee.
Important
If an employee record is finalised partway through the financial year, the ATO will not pre-fill the information into the employee’s tax return until after the end of the financial year.
ATO Security Compliance Requirements
To ensure STP compliance, the ATO requires Digital Service Providers (DSPs) like NightPOS to adhere to strict security standards. The following requirements have been implemented within the NightPOS ecosystem:
Audit Logging: NightPOS maintains comprehensive audit logs for all payroll and accounting-related records. These logs are stored in the database and synchronized with our IAP server for a rolling 12-month period.
Mandatory MFA: Multi-Factor Authentication (MFA) is mandatory for all users with access to payroll and accounting records. This security feature cannot be disabled.
Authentication Persistence: The “Remember Me” functionality is limited to a maximum of 24 hours after 2FA authentication. Once this period expires, NightPOS will automatically log the user out and require a fresh 2FA login.
Idle Session Timeout: Sessions will automatically time out after 30 minutes of inactivity.
Brute Force Protection: User accounts will be locked after a maximum of 5 unsuccessful login attempts.
Onshore Data Hosting: By default, all payroll and accounting records must be hosted onshore. If data is hosted offshore, the customer or partner must proactively contact the ATO’s Digital Partnership Office (DPO).
SSO Restrictions: Users are prohibited from using social media Single Sign-On (SSO) to access sensitive records. While this primarily affects Facebook SSO in standard NightPOS, the restriction applies to all third-party social media integrations.
Credential Expiry: Any security tokens or temporary credentials issued to users with access to NightPOS STP & SS must expire within 24 hours.
Encryption Integrity: Any technical modifications to encryption keys, encryption at rest, or encryption in transit may jeopardize ATO compliance status.