Configure dynamic form fields in PDFs
When creating custom PDFs to import into the Sales app, use dynamic form fields to auto-fill the PDF content with relevant information from the NightPOS database, including names and prices.
Dynamic form fields are configurable text fields that can be added to a PDF form, and NightPOS automatically fills them with values from the sales order/product associated with the quote.
Formatting tips
When designing the base PDF template for a quote’s header or footer, keep the placements of dynamic form field in mind. Use the following tips to avoid overlapping text and other formatting issues:
Leave whitespace: Ensure there is enough room for dynamic data to expand without overlapping logos or borders.
Add line breaks: Place dynamic form fields, like Customer Name, on their own lines. Alternatively, put them at the end of phrases to avoid text breaking. Long names can push static text out of alignment.
Leave whitespace: Ensure there is enough room for dynamic data to expand without overlapping logos or borders.
Add line breaks: Place dynamic form fields, like Customer Name, on their own lines. Alternatively, put them at the end of phrases to avoid text breaking. Long names can push static text out of alignment. text appearance when adding or editing content.
NightPOS recommends editing PDF forms with Adobe software. Form fields in header and footer templates are required to retrieve dynamic values in NightPOS.
Tip
If the PDF is too large to send as an email attachment, try using “system fonts” (e.g., Arial, Helvetica, Times New Roman) instead of custom fonts to reduce the file size.
Create dynamic form fields in PDF
Important
NightPOS does not permit spaces in PDF field names. Only use letters, numbers, hyphens, or underscores.
Note
The following software are examples. They are not endorsements of any specific software.
To add dynamic form fields, use the preferred PDF editor. Adobe Acrobat Pro is the easiest and most commonly used software. Some examples for free open source PDF editors are:
Refer to the following instructions to:
Configure custom dynamic form fields in NightPOS after uploading the PDF.
Adobe Acrobat Pro
Convert the PDF into a PDF form, then add a dynamic form field at the location where the NightPOS information should be inserted. Link the NightPOS fields to the dynamic form fields by double-clicking on the field to open Properties.
In the General tab, enter the name of the NightPOS field for the Name. Set the Common Properties to Visible unless the field needs to be hidden until data is populated.
Next, click the Appearance tab and select the Font Size, Font Choice, and Text Color to match the template’s existing text or branding. Click the Options tab and set the text alignment to match the template’s design.
Generic PDF editor
Open the PDF with the PDF editor, add a dynamic form field where the NightPOS information is needed. Link the NightPOS fields to the dynamic form fields by opening the field’s Properties window. Then, in the Name for that field, enter the name of the NightPOS field.
If possible, configure the Font Size, Font Choice, and Text Color to match the template’s existing text or branding. Click the Options tab and set the text alignment to match the template’s design.
Map PDF form fields to NightPOS
This step connects any dynamic form field in the PDF to the corresponding NightPOS field by specifying the exact location of that information. Once the PDF file is ready, save the changes and upload it to NightPOS via and clicking Upload.
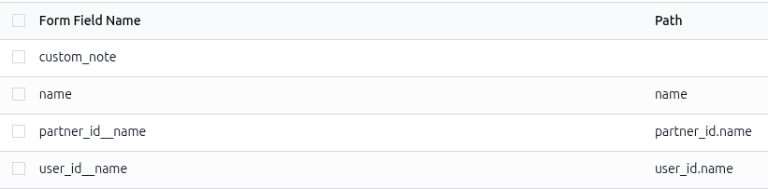
NightPOS automatically detects dynamic form fields in the uploaded PDF and displays the Configure dynamic fields link. Click the Configure dynamic fields link to go to the Form Fields page.
The Form Field Name column is populated with the dynamic form fields from the PDF. The Path column specifies the path to the NightPOS field corresponding to each dynamic form field.

To edit, click the Path cell of the desired form field row and enter the NightPOS field name. Refer to the Common dynamic form fields section for typical field names. Refer to the Find NightPOS field names or paths section for instructions on how to find NightPOS field names and paths.
Find NightPOS field names or paths
Users can enable Developer mode (debug mode) in NightPOS and hover over the desired field to see its technical name, which is the Field value in the pop-up window. Or, while in Developer Mode, navigate to the menu. In the search bar, search for “Sales”, then open a Sales template to see the available dynamic form fields and their paths.
Configure custom dynamic form fields
To pull specific information from a sales order or a product that is not in the Common dynamic form fields section, add a dynamic form field to the PDF with a unique name, then configure the Path to point to the desired information in NightPOS.
When configuring the Path, use the dot (.) notation to specify relationships between
models. Headers and footers start from the current sale_order model. Product documents
follow their path from sale_order_line.
Example
A company wants to display the customer’s country in its quotations. To display the customer’s country in the quotation PDF, they used the dynamic form field name invoice_partner_country in the PDF template. After uploading the PDF to the Sales app, they set the Path of the Form Field Name to:
For a header or footer document: partner_invoice_id.country_id.name

Example of NightPOS’s Form Field Path for the customer’s country from a quotation.
For a product document: order_id.partner_invoice_id.country_id.name

Example of NightPOS’s Form Field Path for the customer’s country from a product document.
Create a custom note form field
When uploading any PDF containing the form field custom_note, leaving the Path empty allows the seller to add any note to that form field in the document, which shown when the PDF is built.
Leave the Path column cell empty for the custom_note row.
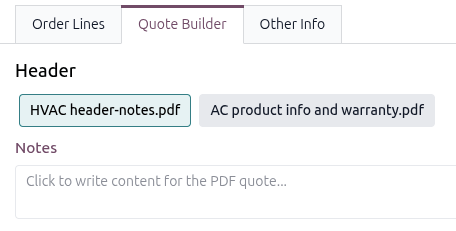
The note field in the Header section in the Quote Builder tab on a quotation.
Common dynamic form fields
Below are common dynamic form fields to use in custom PDFs that automatically map to the correct NightPOS fields when uploaded to the Sales app, and what they represent.
For headers and footers PDF:
name: Sales Order Reference
partner_id__name: Customer Name
user_id__name: Salesperson Name
amount_untaxed: Untaxed Amount
amount_total: Total Amount
delivery_date: Delivery Date
validity_date: Expiration Date
client_order_ref: Customer Reference
For product PDF:
description: Product Description
quantity: Quantity
uom: Unit of Measure (UoM)
price_unit: Price Unit
discount: Discount
product_sale_price: Product List Price
taxes: Taxes name joined by a comma (
,)tax_excl_price: Tax Excluded Price
tax_incl_price: Tax Included Price
Example
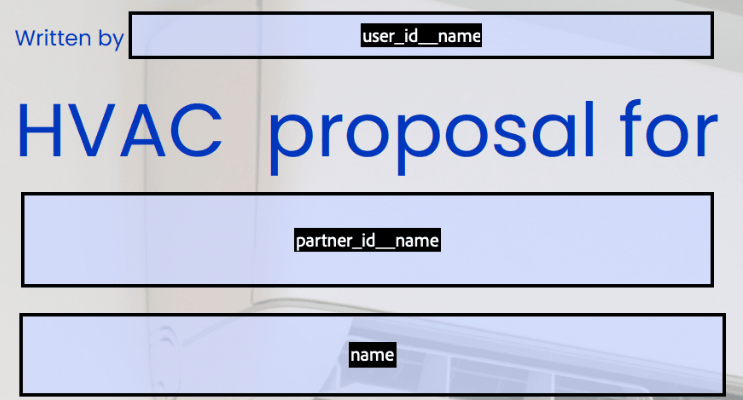
When creating a PDF, it’s best practice to use common dynamic form fields (user_id_name, partner_id_name, and name). When uploaded into the database, NightPOS auto-populates those fields with the information from their respective fields.
In this case, NightPOS would auto-populate the Salesperson’s name in the user_id_name dynamic text field, the Sales Order Reference in the name field, and the Customer Name in the partner_id_name field.