Products
NightPOS Point of Sale allows you to create products and manage product information from the backend or in the POS register. Products can be configured in various ways, including creating variants, product combinations, and POS-specific product categories, and adding tags and images. You can also group products by units and manage stock.
Product creation
To create products from the backend, go to , and click New to create a product, or select an existing one to edit it. Ensure the Point of Sale checkbox is enabled at the top of the form, then configure the product’s general information, such as defining the product type, setting a tracking strategy, or adding a product image, as needed. Configure advanced, POS-specific product details as needed.
Tip
It is also possible to create a product from the POS interface. To do so, open the POS register, click the (hamburger menu) icon, then select Create Product. Enter the product details in the popover and click Save. The product is immediately available in the POS register. Existing products can also be updated directly from the POS register through the product information popover.
Note
When using POS product categories, each product must be assigned to a POS Category; otherwise, the product will not be displayed or available for selection.
Product information display in the POS register
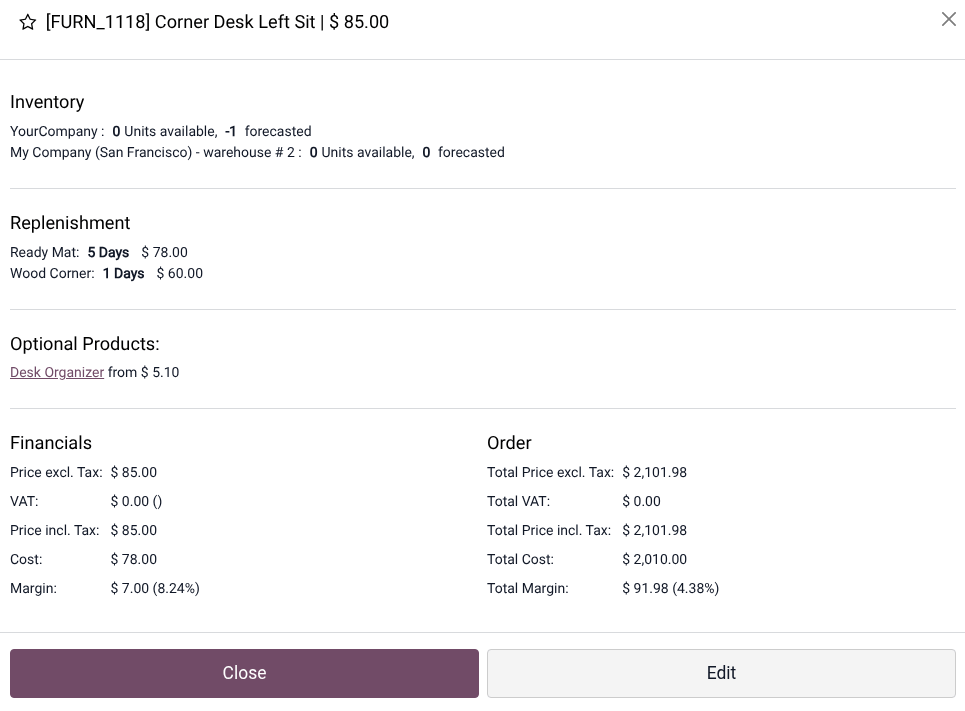
To view and edit product information from the POS register, click and hold the product to access the following details:
the available and forecasted stock, including warehouse information,
financial information, such as prices, taxes, costs, and margins.
You can also access and edit the product information of a product that has already been added to the cart by selecting the product, clicking the (vertical ellipsis) icon, then the Info button.
Tip
To display margins and costs in the product information window, go to the POS settings, navigate to the Product & PoS categories section, and enable Show margins & costs.
Product configuration
Once the product is created, navigate to the Point of Sale tab on the product form to configure the following POS-specific options:
Enable the To Weigh With Scale option if the product must be weighed. Configure a connected scale for this purpose.
Select POS-specific categories.
Define a Color to highlight the product in the POS register.
Enable Available in Self Order if the product can be ordered in self-ordering mode. This option only appears once the self-ordering mode is enabled.
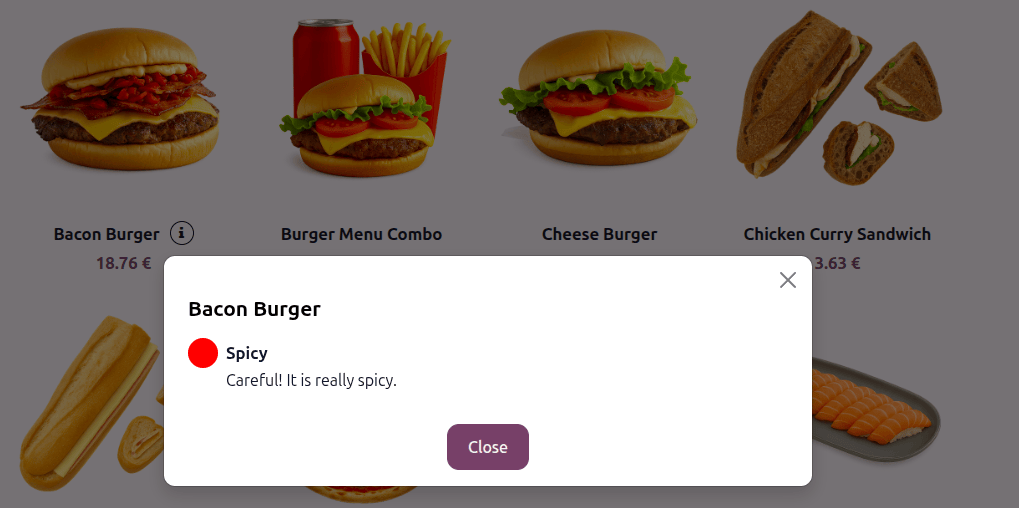
Write a Description to display in the product information window in the POS register and in self-ordering mode when clicking the info button.
In the Upsell & cross-sell section, enable POS Optional Products to suggest optional products when adding items to the cart in the POS register.
If applicable, configure Urpan Piper and/or decide if the product is Available for Platform Orders, such as GrabFood or GoFood.
Above that, you can configure additional options, such as product variants, product tags, product and category images display, and units of measure.
Product variants
To allow the use of different product variants, go to , scroll down to the Products, enable Variants, and Save.
Note
The Inventory app is automatically installed when using the Point of Sale app.
Then, navigate to , select a product, and configure attributes and their values to create variants in the Attributes & Variants tab. On the value’s form, enable Available on Food Delivery for values available through delivery platforms, if applicable.
Tip
Navigate to to manage all configured attributes, or to to view all variants.
Practical application
Users in the POS register and customers in self-ordering mode can select product variants when adding items to the cart.
Product Tags
Product tags help highlight specific features in self-ordering mode. To create product tags, go to . On the Product Tags page, click New or select an existing tag.
On the product tag form:
Enter a Tag label.
Enable/disable Visible to customers to control whether the tag is visible to customers in self-ordering mode.
Optionally, choose a Color or add an image. If both are configured, the image replaces the tag’s color.
In the Point of sale section, write a description to be shown in self-ordering mode.
To add tags to a product, navigate to the product form, go to the Sales tab, and, in the Extra info section, add as many Tags as needed.
Note
If the eCommerce app is installed, tags are used in both apps, and need to be added in the Ecommerce shop section of the Sales tab.
Practical application
Tags are displayed only in self-ordering mode, not in the POS register. Customers can view the tags and tag descriptions by clicking the (info) icon next to the product name.
Product units
Products can be grouped by unit of measure in the POS register and on the customer display.
To do so, follow these steps:
Enable Units of Measure & Packagings in the Inventory app settings.
Click the Units & Packagings link to view all configured units.
Select a unit.
Activate developer mode.
Enable Group Products in POS.
Practical application
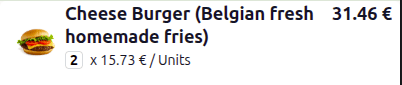
When a customer orders multiple units of the same product, the products are grouped into a single line rather than appearing individually. The unit price is displayed below the product, and the total amount appears next to it.
Product and category images
Images can be added for products, product tags, variants, and categories. They can be displayed in the POS register, on the customer display, and/or in self-ordering mode, as follows:
POS register |
Customer display |
Self-ordering mode |
|
|---|---|---|---|
Product image |
on the Your Order page |
||
Product tag image |
when clicking the Info button |
||
Product variant image |
on the Your Order page |
||
Category image |
Once you have added images to products or categories, configure their visibility in the POS register. To do so, navigate to the POS settings, scroll down to the POS interface section, and under Hide pictures in POS, enable/disable Show product images and/or Show category images.
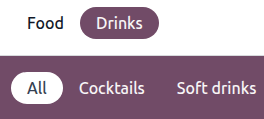
POS product categories
POS product categories are used to group products in the POS register to aid navigation.
To manage POS categories, follow these steps:
Navigate to .
Click New to create a category or select an existing one to update it.
On the category form:
Enter or edit the label for the category.
Select a Parent Category to build a hierarchy of categories. A parent category groups one or more child categories (e.g., use
Drinksto groupHot beveragesandSoft drinks).Define a Color for display in the POS register.
Add an image if needed.
If online food delivery platforms are configured in your database, indicate their Service Hours.
After creating POS product categories, assign them to specific products on the product form.
To only display specific categories in the POS register, go to the POS settings, navigate to the Product & PoS categories section, then, in the Restrict Categories field, select the categories that should be available.
Practical application
Product categories are displayed in the POS register and in self-ordering mode. Subcategories appear after selecting a parent category.
Tip
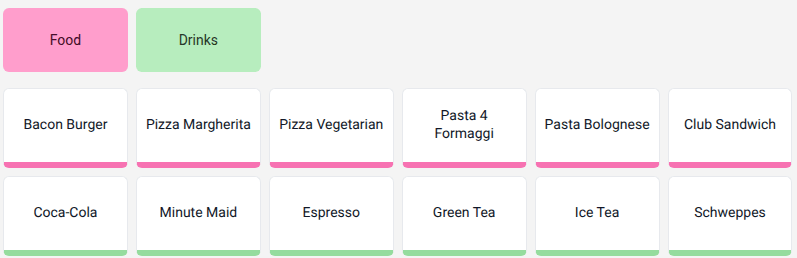
If no category is selected in the POS register, all products are displayed. To organize products by category in this view, navigate to the POS settings, scroll down to the PoS Interface section, and enable Group products by categories.
Example
In this POS register, two categories are configured, Food and Drinks, but neither of them is currently selected. The overview shows all products in both categories, grouped by category on separate rows.
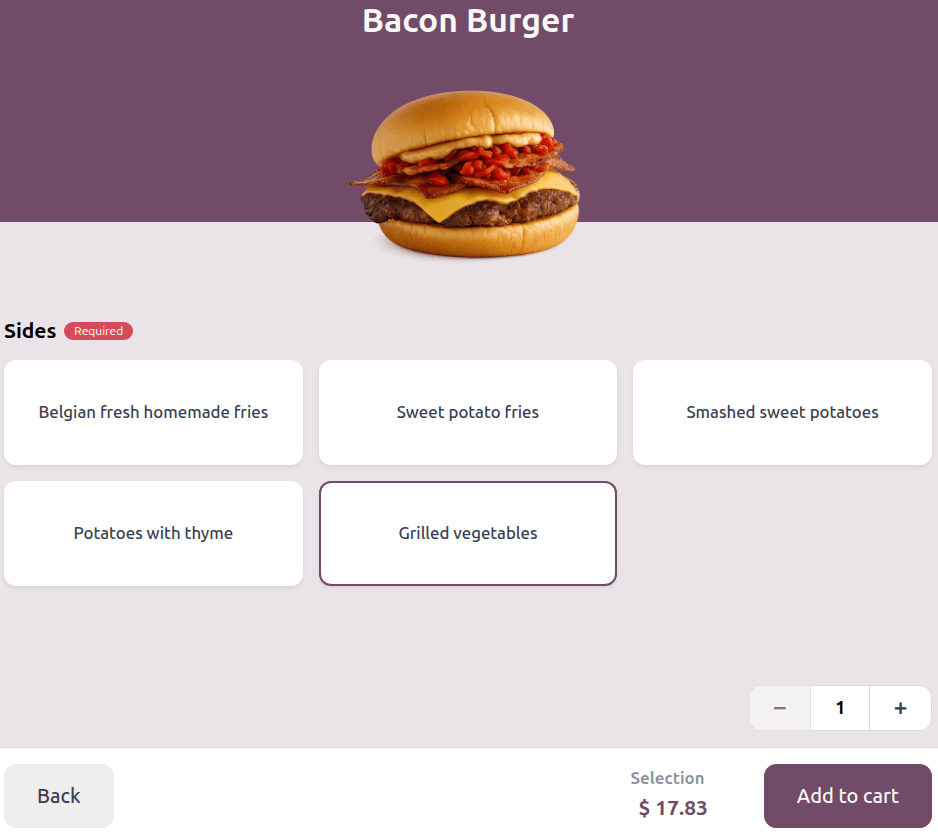
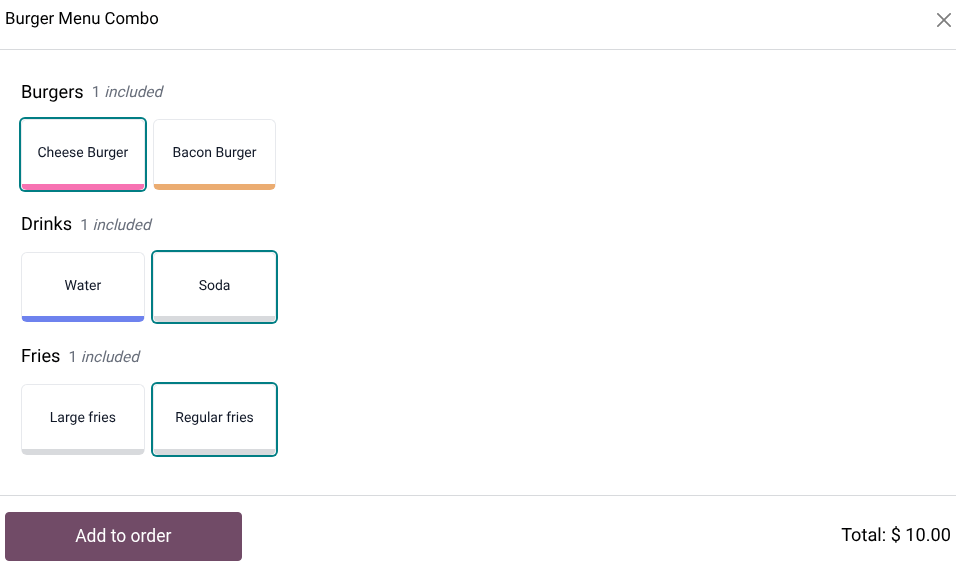
Product combos
A product combo is a bundle of multiple products sold together as a single unit. Each product combo consists of multiple categories, known as combo choices, and each combo choice contains several items. When purchasing a product combo, customers can select one or more items from each combo choice.
Example
A burger menu is offered as a product combo including three combo choices: one burger, one drink, and one portion of fries. For each combo choice, customers select one item from the available options (e.g., cheese burger or bacon burger; water or soda; large or regular fries).
Tip
To change the selection after adding a product combo to the cart, click and hold the combo item in the cart to reopen the selection popover.
See also
Combo choice creation
To create the combo choices that will be added to the product combo, follow the next steps:
Go to and click New.
Enter a name for the Combo Choice.
Set the maximum selectable items for the combo choice using the Maximum items field.
Set the number of items included in the combo choice using the Includes items field.
If you are in a multi-company environment, choose the relevant Company. Leave the field empty to make it available for all companies.
Click Add a line under the Options section to add the products that constitute the Combo Choices.
If needed, click a product to add an Extra Price.
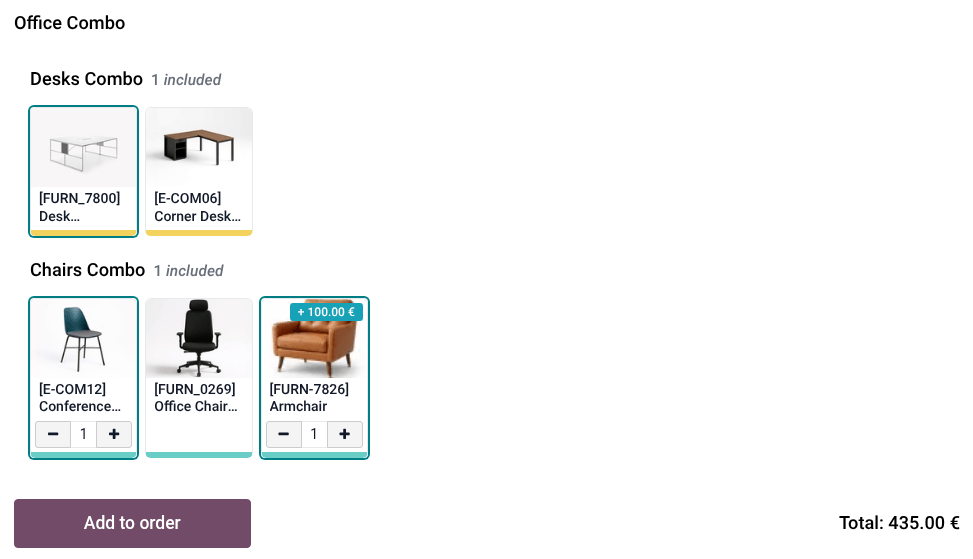
Combo Price vs. Extra Price
The Combo Price field shows the price applied to any additional product a customer might select (i.e., when the Maximum items field is set to
2or higher). This price is automatically calculated based on the price of the least expensive product defined in the Combo Choice.The Extra Price field is used to set an additional charge for a specific product in the combo choice, e.g., to cover higher costs or encourage upselling. This extra price is applied each time a customer selects that product within the combo choice.
Product combo creation
To create a specific product that contains combo choices, follow the next steps:
Go to and click New.
Enter a product name.
Set the Product Type to Combo and select the relevant Combo Choices.
Add a Sales Price.
Optionally, click the Point of Sale tab to select the preferred Category.
Note
The total price of the product combo displayed in the POS register is based on the Sales Price defined on the product combo’s form. Selecting several products in the combo choices and selecting a product with an Extra Price influences the total price.
Example
The Office Combo has a Sales Price of 300 € and offers a selection of chairs and desks. The combo choice for chairs includes a conference chair, an office chair, and an armchair, with a maximum selectable amount set to 2. For each additional chair a customer selects, a Combo Price of 35 € is added. The armchair has an Extra Price of 100 € because it is made of leather. Selecting both the conference chair and the armchair increases the price of the Office Combo to 435 €, i.e., Sales Price + 35 € (Combo Price) for adding a second chair + 100 € (Extra Price) for the leather armchair.
Stock management
To track stock for POS products, the product type must be set to Goods or Combo, and the track inventory option must be enabled. Products can be tracked by quantity, by lot, or by serial number.
Tip
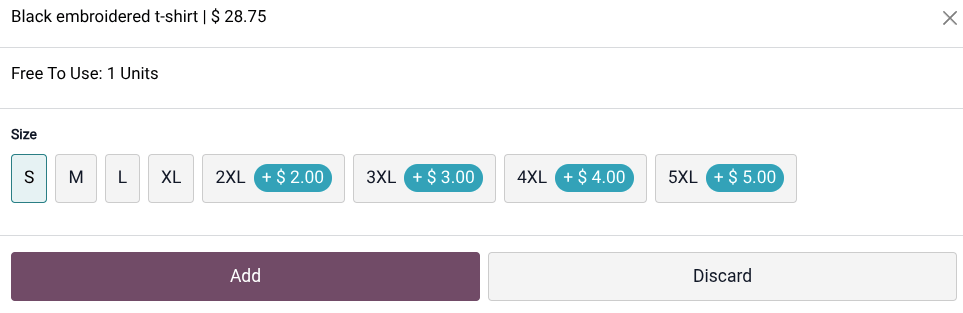
When adding tracked items to the cart, the number of Free To Use units is displayed in the POS configuration popover.
Serial numbers and lots
Using lots and serial numbers allows product movements to be tracked throughout a product’s lifecycle. When traceability is enabled, NightPOS identifies a product’s location based on its last recorded movement.
To track products by lots or serial numbers:
Tip
Expiration dates can also be configured for products tracked by lot or serial number.
Selling tracked products
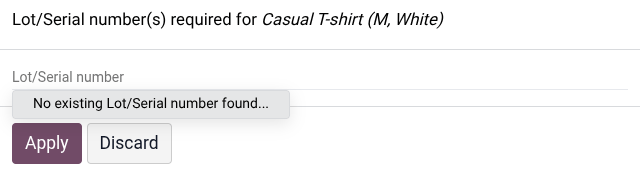
Adding a tracked product to the cart from the POS register automatically imports its serial number or lot number. If no tracking number exists, a popover appears to create and assign one.
Note
When you load a quotation or sales order containing tracked products, a popover asks whether the numbers linked to the quotation or sales order should be imported. Click Ok to proceed.
Once tracking numbers are assigned or imported, they appear in the cart below the corresponding products, next to the (Valid product lot) icon. The icon’s color highlights if the tracking has been assigned:
Green (Valid product lot) icon: The tracking number was successfully imported or assigned.
Red (Invalid product lot) icon: The tracking number is missing or incorrect.
To change a tracking number, click the (Valid product lot) icon, select a different lot or serial number from the popover, and click Apply.
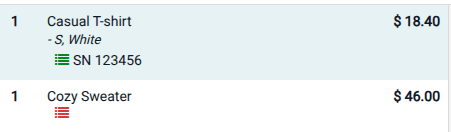
Example
The icon appears in green for the Casual T-shirt as the serial number 123456 has
been assigned. On the other hand, the icon is red for the Cozy sweater because no
serial number has been assigned.
Note
Missing or invalid tracking numbers do not block the sale, but a warning popover must be acknowledged before proceeding to payment.
See also