Lead times
Accurate delivery date forecasting is essential for customer satisfaction. The Inventory app provides comprehensive lead time configuration settings to improve the coordination and planning of manufacturing orders, deliveries, and receipts.
Types of lead times
Different lead times for different operations can impact various stages of the order fulfillment process. The following lead times can be configured in NightPOS:
Customer lead time: The number of days from the sales order (SO) confirmation date and the date the order is shipped from the warehouse. This is the expected time frame for customer order fulfillment, also known as delivery lead time.
Sales security lead time: Moves the scheduled delivery date forward by a specified number of days. This serves as a buffer to account for potential delays in the fulfillment process and ensures ample time to prepare the outgoing shipment.
Shipping policy lead time: The shipping policy lead time determines how the scheduled delivery date is set for orders with multiple products, based on the lead times of the products in the order. This provides flexibility to choose between multiple shipments delivered as soon as products are ready, or one consolidated shipment when all products are ready.
Manufacturing lead time: The number of days needed to complete a manufacturing order (MO) from the date of confirmation, including weekends (non-working hours in NightPOS). This is used to forecast an approximate production date for a finished good.
Days to prepare manufacturing order: The number of days needed to replenish components, or manufacture sub-assemblies of the product. Either set one directly on the bill of materials (BoM), or click Compute to sum up purchase and manufacturing lead times of components in the BoM.
Vendor lead time: The number of days from the confirmation of a purchase order (PO) to the receipt of products. This provides insight on the time it takes for products to arrive at the warehouse, facilitating effective scheduling and planning of supplier deliveries.
Days to purchase: The number of days needed for the vendor to receive a request for quotation (RFQ) and confirm it. This advances the deadline to schedule a RFQ by a specified number of days.
See also
Lead times are calculated in the order provided above, working backward from the delivery deadline using just-in-time (JIT) logic.
The manual replenishment timeline can be further extended by increasing the forecasted date on the replenishment report. See horizon days to learn more.
Sales lead times
Customer lead times and sales security lead times can be configured to automatically compute an expected delivery date on a SO. The expected delivery date ensures a realistic delivery dates setting for shipments from the warehouse.
NightPOS issues a warning message if the set delivery date is earlier than the expected date, as it may not be feasible to fulfill the order by that time, which would impact other warehouse operations.
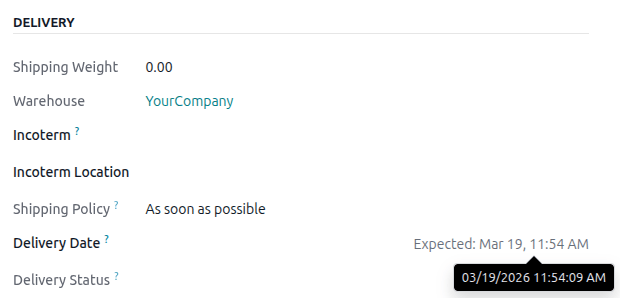
Example
A SO containing a Coconut-scented candle is confirmed on March 4. The
product has a customer lead time of 14 days, and the business uses a sales security lead time of
1 day. Based on the lead time inputs, NightPOS suggests a delivery date in 15 days, on March 19.
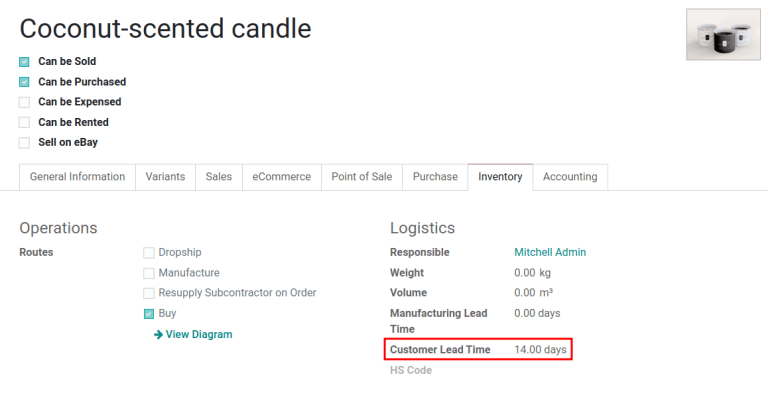
Customer lead time
The customer lead time is manually assigned for each individual product. To set the customer lead time for a product, navigate to . Select the desired product, and switch to the Inventory tab. In the Customer Lead Time field, enter the number of calendar days required to fulfill the delivery order from start to finish.
Example
Set a 14-day customer lead time for the Coconut-scented candle by navigating to its product
form. Then, in the Inventory tab, type 14.00 days into the Customer Lead
Time field.
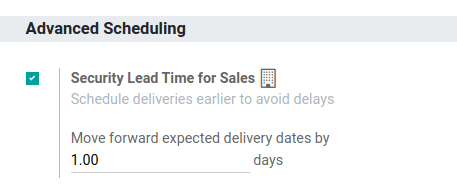
Sales security lead time
The sales security lead time applies to all sales orders for the company. To set the sales security lead time, navigate to , and scroll down to the Advanced Scheduling section near the end of the page. Check the box for Security Lead Time for Sales to enable the feature.
Next, enter the desired number of calendar days. This security lead time is a buffer notifying the team to prepare for outgoing shipments earlier than the scheduled date.
Example
Setting the Security Lead Time for Sales to 1.00 day, pushes the
Scheduled Date of a delivery order (DO) forward by one day. In that case, if a
product is initially scheduled for delivery on April 6th, but with a one-day security lead time,
the new scheduled date for the delivery order would be April 5th.
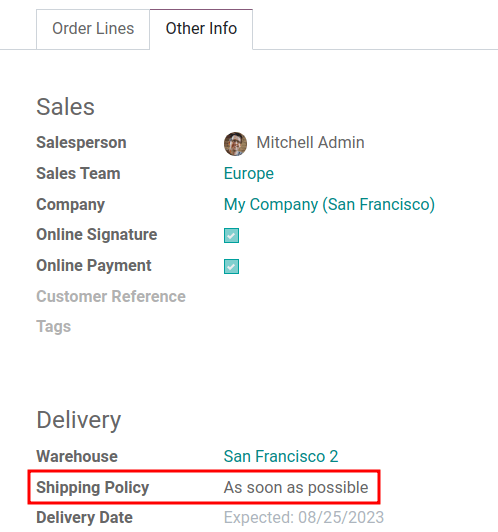
Shipping policy
For orders that include multiple products with different lead times, the lead times can be configured directly from the quotation itself. On a quotation, click the Other Info tab and set the Shipping Policy field.
As soon as possible: Deliver products as soon as they are ready. The Scheduled Date of the DO is determined by adding today’s date to the shortest lead time among the products in the order.
When all products are ready to wait to fulfill the entire order at once. The Scheduled Date of the DO is determined by adding today’s date to the longest lead time among the products in the order.
Example
In a quotation containing 2 products, Yoga mat and Resistance band, the products have a lead
time of 8 days and 5 days, respectively. Today’s date is April 2nd.
When the Shipping Policy is set to As soon as possible, the scheduled delivery date is 5 days from today: April 7th. On the other hand, selecting When all products are ready configures the scheduled date to be 8 days from today: April 10th.
Manufacturing lead times
Lead times can help simplify the procurement process for consumable materials and components used in manufactured products with bills of materials (BoMs).
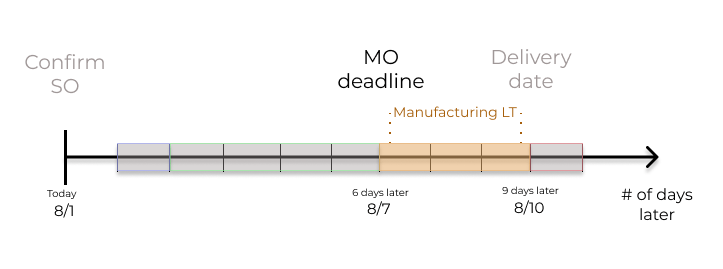
The MO deadline, which is the deadline to begin the manufacturing process to complete the product by the scheduled delivery date, can be determined by configuring the manufacturing lead times and manufacturing security lead times.
Manufacturing lead time
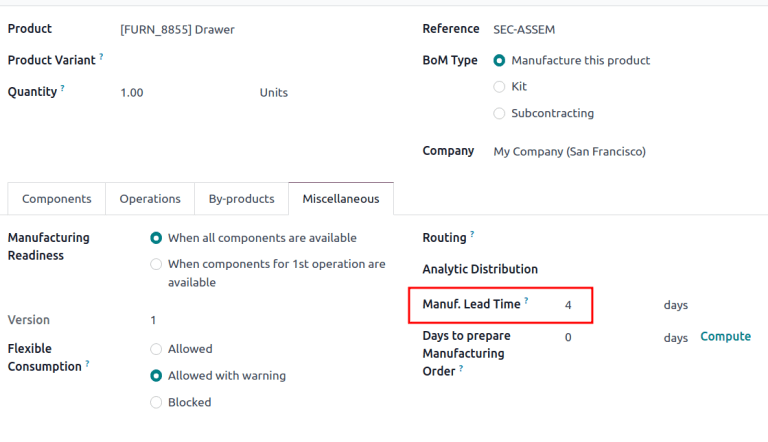
Manufacturing lead times for products are configured from a product’s bill of materials (BoM) form.
To add a lead time to a BoM, navigate to , and select the desired BoM to edit.
On the BoM form, click the Miscellaneous tab. Change the value (in days) in the Manuf. Lead Time field to specify the calendar days needed to manufacture the product.
Note
If the selected BoM is a multi-level BoM, the manufacturing lead times of the components are added.
If the BoM product is subcontracted, the Manuf. Lead Time can be used to determine the date at which components should be sent to the subcontractor.
Establish a MO deadline, based on the expected delivery date, indicated in the Scheduled Date field of the DO.
The MO deadline, which is the Scheduled Date field on the MO, is calculated as the expected delivery date subtracted by the manufacturing lead time.
This ensures the manufacturing process begins on time, in order to meet the delivery date.
However, it is important to note that lead times are based on calendar days. Lead times do not consider weekends, holidays, or work center capacity (the number of operations that can be performed at the work center simultaneously).
Example
A product’s scheduled shipment date on the DO is August 15th. The product requires 14 days to manufacture. So, the latest date to start the MO to meet the commitment date is August 1st.
Days to prepare manufacturing order
Configuring the days required to gather the components for a manufactured product ensures there is enough time to either replenish components or manufacture semi-finished products. This can be used as an extra figure to cross-check and confirm that the order can be completed within the customer lead time.
Go to and select the desired BoM. In the Miscellaneous tab of the BoM, specify the calendar days needed to obtain components of the product in the Days to prepare Manufacturing Order field, or click Compute next to the Days to prepare Manufacturing Order field to automatically fill in the longest lead time among all the components listed on the BoM.
Example
A BoM has two components: one has a manufacturing lead time of two days, and the other has a purchase lead time of four days. The Days to prepare Manufacturing Order is four days.
Purchase lead times
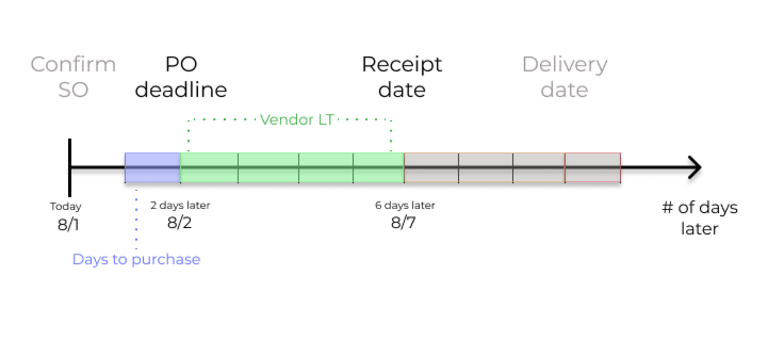
Automatically scheduling supplier orders streamlines procurement by showing users exactly when to confirm a request for quotation (RFQ) and when to expect the goods.
Field |
Description |
|---|---|
Order Deadline |
Last calendar day to confirm the RFQ and convert it to a PO |
Expected Arrival |
Arrival date of the products. Calculated by Order Deadline + Vendor Lead Time |
Tip
A PO is marked late if the Expected Arrival date has passed. Late POs appear in the Late box on the Purchase app’s dashboard.
In addition, NightPOS has purchase lead times, which act as buffers to widen the just-in-time (JIT) forecast window. These lead times affect replenishment methods that use pull rules—for example reordering rules or make to order (MTO).
Buffer |
Purpose |
Impact on dates |
|---|---|---|
Days the vendor needs to review an RFQ after it is sent. |
No effect on the RFQ/PO; adds buffer days in the JIT forecast window. |
|
Days from the confirmation of a purchase order (PO) to the receipt of products. |
Affects the RFQ/PO, adds buffer days in the JIT forecast window. |
Example
To tie the purchase dates and lead times together, consider this:
Today’s date: April 21
Vendor Lead Time: 1 day
Days to Purchase: 2 days
Days from today = 1 + 2 = 3
Forecasted date = April 24
If an RFQ is created today, the following fields show:
Order Deadline: April 23 (\(\text{Today} + 2\))
Expected Arrival: April 24 (\(\text{Order Deadline} + 1\))
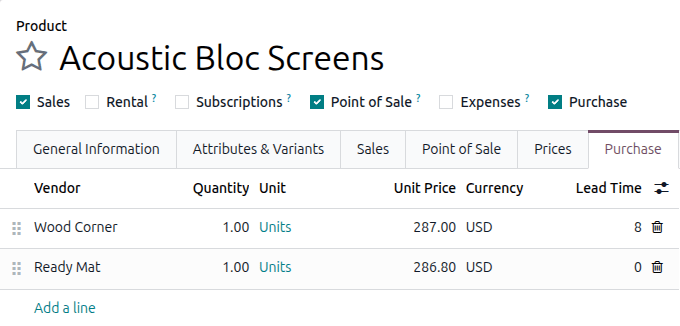
Vendor lead time
To set a vendor lead time for orders arriving in the warehouse from a vendor location, navigate to . Select the desired product, and switch to the Purchase tab. In the editable vendor Purchase tab to add a pricelist. Click the Add a line button to add vendor details, such as the Vendor name, Unit Price offered for the product, and lastly, the Lead Time.
Note
Multiple vendors and lead times can be added to the vendor pricelist. The default vendor and lead time selected is the entry at the top of the list.
Example
On the vendor pricelist of the product form, the Lead Time for the selected vendor is
set to 10 days.
Days to purchase
Days to purchase affects only replenishment methods that use pull rules—for example reordering rules or make to order (MTO). It does not change the interval between Order Deadline and Expected Arrival.
To set it up, go to . Under the Advanced Scheduling section, in the Days to Purchase field, specify the number of days required for the vendor to confirm a RFQ after receiving it from the company.
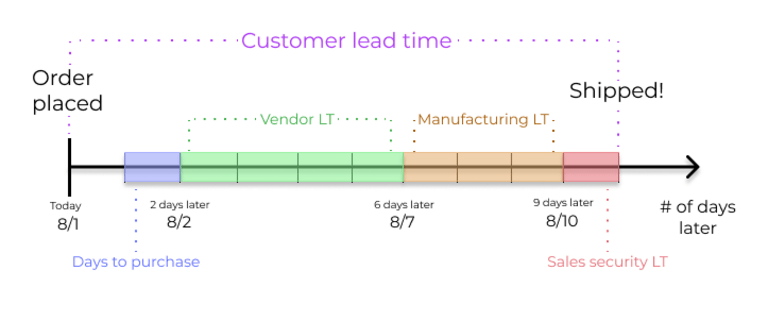
Global example
See the following example to understand how all the lead times work together to ensure timely order fulfillment:
Sales security lead time: 1 day
Manufacturing lead time: 3 days
Vendor lead time: 4 days
Days to purchase: 1 day
The customer places an order for a manufactured product on August 1, and the scheduled delivery date from the warehouse is on August 11. NightPOS uses lead times and automated reordering rules to schedule the necessary operations, based on the outgoing shipment delivery date of August 11:
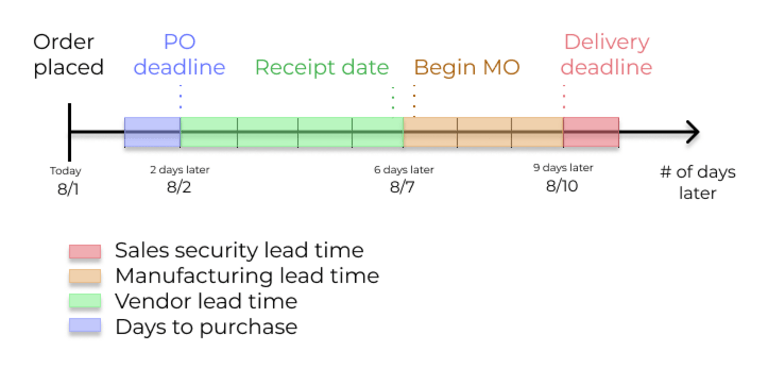
August 1: Sales order created, confirmed by salesperson.
August 2: Deadline to order components to ensure they arrive in time when manufacturing begins (4-day supplier lead time).
August 7: Scheduled date of receipt for components.
August 7: Deadline to begin manufacturing. Calculated by subtracting the manufacturing lead time of 3 days from the expected delivery date of August 10.
August 10: Scheduled Date on the delivery order form indicates the updated expected delivery date. Originally set as August 11, but the sales security lead time pushes the date forward by a day.
NightPOS’s replenishment planning maps a business’ order fulfillment process, setting pre-determined deadlines and raw material order dates, including buffer days for potential delays. This ensures products are delivered on time.