Work order dependencies
When manufacturing certain products, specific operations may need to be completed before others can begin. To ensure operations are carried out in the correct order, the Manufacturing app features a work order dependencies setting. Enabling this setting allows for operations on a bill of materials (BoM) to be blocked by other operations that should occur first.
Configuration
The work order dependencies setting is not enabled by default. To enable it, navigate to . Then, enable the Work Orders setting, if it is not already active.
After enabling the Work Orders setting, the Work Order Dependencies setting appears below it. Enable Work Order Dependencies, then click Save to confirm the changes.
Add dependencies to BoM
Work order dependencies are configured on a product’s BoM. To do so, navigate to , then select a BoM, or create a new one by clicking New.
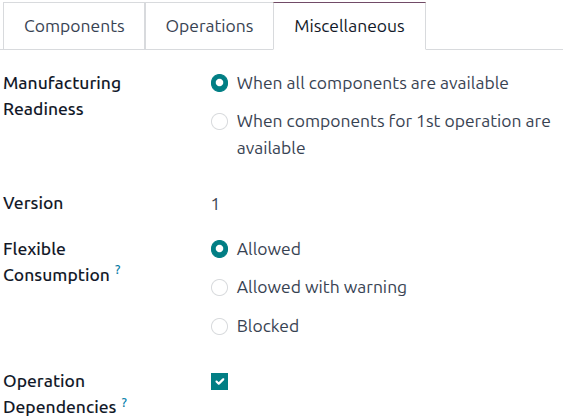
On the BoM, open the Miscellaneous tab, then enable the Operation Dependencies checkbox. The Blocked By option becomes available under the (settings) menu of the Operations tab.
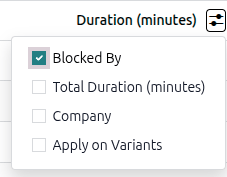
Open the Operations tab. Click the (settings) icon, then enable the Blocked By checkbox. The Blocked By field appears for each operation in the tab.
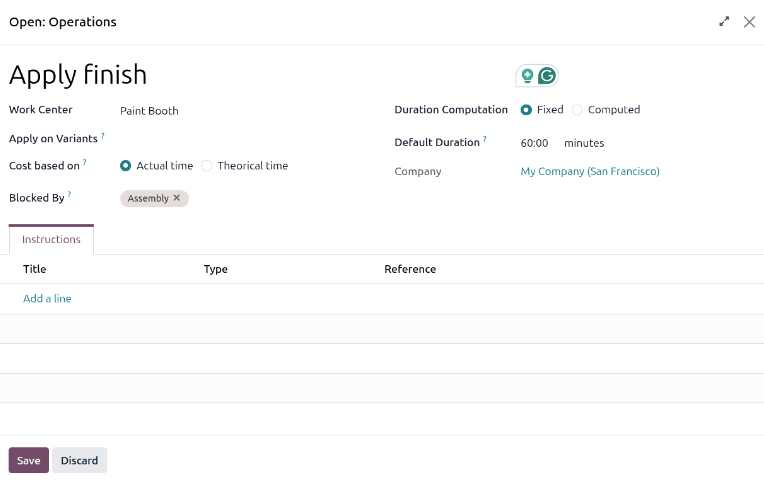
In the line of the operation that should be blocked by another operation, click the Blocked By field. The Open: Operations pop-up window opens. In the Blocked By field, select the blocking operation that must be completed before the operation that is blocked.
Finally, save the BoM by clicking (Save manually).
See also
Plan work orders using dependencies
After work order dependencies are configured for a BoM, the Manufacturing app can plan when work orders are scheduled based on those dependencies. To plan the work orders for a manufacturing order, navigate to .
Next, select a manufacturing order for a product with work order dependencies set on its BoM, or create a new manufacturing order by clicking New. If a new manufacturing order is created, select a BoM configured with work order dependencies from the Bill of Material drop-down field, then click Confirm.
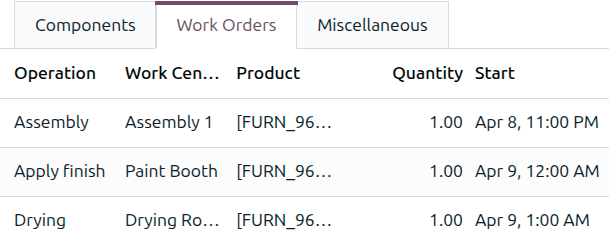
After confirming the manufacturing order, open the Work Orders tab to view the work orders required to complete it. Any work orders that are not blocked by a different work order display a To Do tag in the Status column.
Work orders that are blocked by other work orders display a Blocked tag instead. After the blocking work orders are completed, the tag updates to To Do.

To schedule the manufacturing order’s work orders, click the Plan button at the top of the page. After doing so, the Start field for each work order on the Work Orders tab populates with a scheduled start date and time. A blocked work order is scheduled at the end of the time period specified in the Expected Duration field of the work order that precedes it.
Example
A manufacturing order is created for Product A. The manufacturing order has two operations: Cut and Assemble. Each operation has an expected duration of 60 minutes, and the Assemble operation is blocked by the Cut operation.
The Plan button for the manufacturing order is clicked at 1:30 pm, and the Cut operation is scheduled to begin immediately. Since the Cut operation has an expected duration of 60 minutes, the Assemble operation is scheduled to begin at 2:30 pm.
Planning views
Two work order planning views are available to display a visual representation of how work orders are planned:
Both open a Work Orders Planning page. This page shows a timeline of all the work orders scheduled for each operation.
Planning by Production is best used to view work orders grouped by manufacturing order. This view is ideal for providing estimated delivery times or determining if an order will be completed on schedule.
Planning by Workcenter is best used to view work orders grouped by the work center at which they take place. This view can help identify overloaded machines or bottlenecks in production.
In both views, if one work order is blocked by the completion of another, the work order that is blocked is shown as scheduled to start after the work order that blocks it. In addition, a grey arrow connects the two work orders, leading from the blocking operation to the blocked operation.
Rescheduling work orders
By default, linked work orders on the Work Orders Planning page can be rescheduled automatically, ensuring that work orders cannot be moved out of the order they are set in.
Work orders can be scheduled with a buffer, or the time gap between consecutive work orders. By default, this view is set to Auto-Reschedule (Keep Buffer). When the buffer is kept, the work orders are moved, and the gap is maintained. If the buffer is important, use this setting.
Example
A manufacturing order for a table has two work orders:
Apply finish
Assemble
The first work order has a 24-hour buffer built in to allow for the finish to cure. When a work order is rescheduled, the 24-hour buffer is maintained.
Alternatively, you can use the Auto-Reschedule (Use Buffer) setting by selecting it from the Auto-Reschedule (Keep Buffer) drop-down menu. Select this option if the gaps were accidental and meeting a due date is a priority.
For full control over rescheduling work orders, select Manual Reschedule.
Important
Unless there is a specific reason to compress the buffer, it is important to maintain the Auto-Reschedule (Keep Buffer) setting. Other work orders upstream from the work order being rescheduled could run late and cause issues with the production schedule.
Resolving inconsistencies
When the Work Orders Planning page is set to manually reschedule work orders, it is possible to introduce inconsistencies in the manufacturing order.
The arrows on the Work Orders Planning page can also point out inconsistencies in the manufacturing order and how to correct them. When the arrow changes color, an inconsistency has been introduced.
Example
A workshop is manufacturing a table in three work orders:
Assemble
Apply finish
Dry
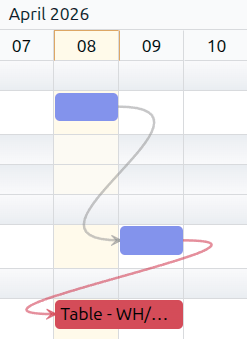
If the third work order is moved before the second work order, the third work order and the arrow pointing to it turn red to indicate that the planned schedule violates the defined work order dependency.
When hovering over the connecting line, an X (cancel) button appears. When clicking this button, NightPOS assumes the dependencies no longer apply due to an exception, and the link between the steps is broken. To remove the dependency, hover over the connecting line. Click the X (cancel) button that appears, and the arrow between the two work orders disappears.
To resolve the scheduling conflict and keep the dependency, select the red work order. Click the Edit button, and the Open window appears. Click the red (exclamation triangle) icon next to the Start Date, and the Scheduling Information pop-up window appears.
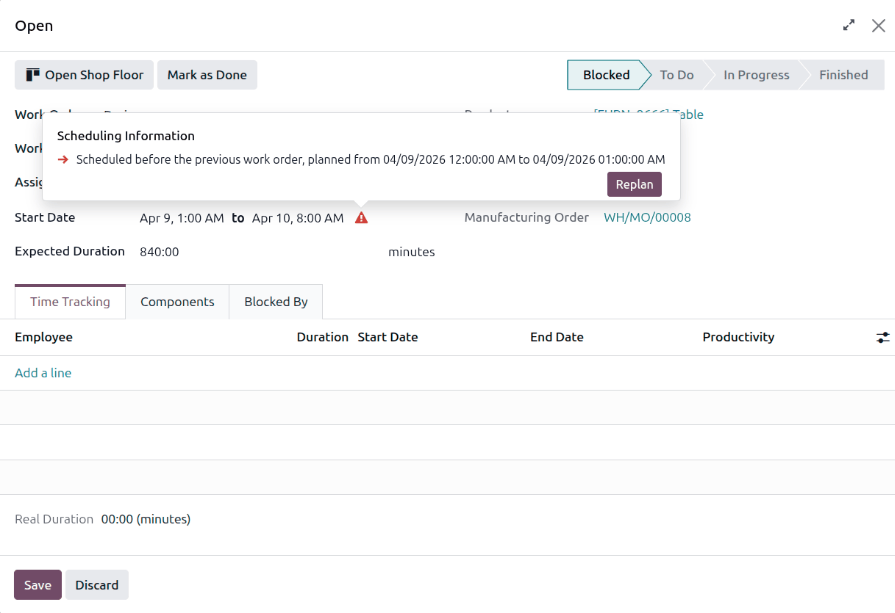
Click the Replan button, then click Save to save the changes to the work order. The work order is rescheduled after the previous work order in a way that maintains the work order dependency.