Resupply subcontracting
In resupply subcontracting, a company supplies the components of its product to a subcontractor, who manufactures the product, then delivers the finished product to the company’s warehouse.
This document covers how to configure a subcontracted product and walk through the resupply subcontracting process.
Note
This document uses the term company to refer to the internal company requiring subcontracted goods, and the term subcontractor to refer to the external vendor handling the outsourced production of the subcontracted goods.
Configuration
To use the resupply subcontractor workflow, companies must first configure products with a vendor pricelist and a subcontracting-type BoM specifying the product’s components.
The pricelist allows the company to purchase the product from the subcontractor through a PO. The BoM allows the product to be manufactured externally by the subcontractor and automatically configures the components to be resupplied by the company.
Configure product vendor
To configure a product’s vendor for resupply subcontracting, navigate to , and select a product, or create a new one.
On the product form, click the Purchase tab and add the product’s subcontractor as a vendor by clicking Add a line. Select the subcontractor using the Vendor drop-down menu.
Then, enter the price of the product in the Unit Price field.
Finally, set a Lead Time for the product in the corresponding field to specify the number of days for the subcontractor to receive components, produce the product, and deliver the finished good.
Note
Since contractors are not responsible for manufacturing the final product, there is no need to configure manufacturing lead times on a BoM. Instead, provide only a single Lead Time on the vendor pricelist, factoring in the duration for the subcontractor to receive the components from the contractor, manufacture the product, and deliver the finished goods back to the company.
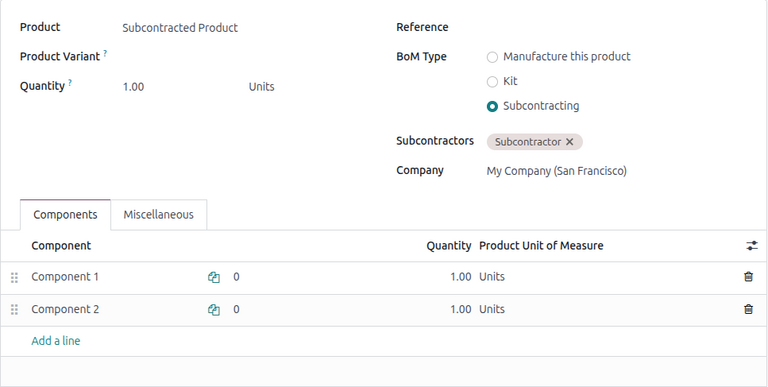
Configure BoM
After specifying the vendor, configure a subcontracting-type BoM for the product. To start, click the Bill of Materials smart button on the product’s page. Then, select the desired BoM or create a new one.
Tip
Alternatively, navigate to , and select the BoM for the subcontracted product.
In the BoM Type field, select the Subcontracting option. Then, add one or more subcontractors in the Subcontractors field below.
Finally, add all necessary components in the Components tab. To add a new component, click Add a line. Then, select the Component using the drop-down menu , and specify the required Quantity in the corresponding field.
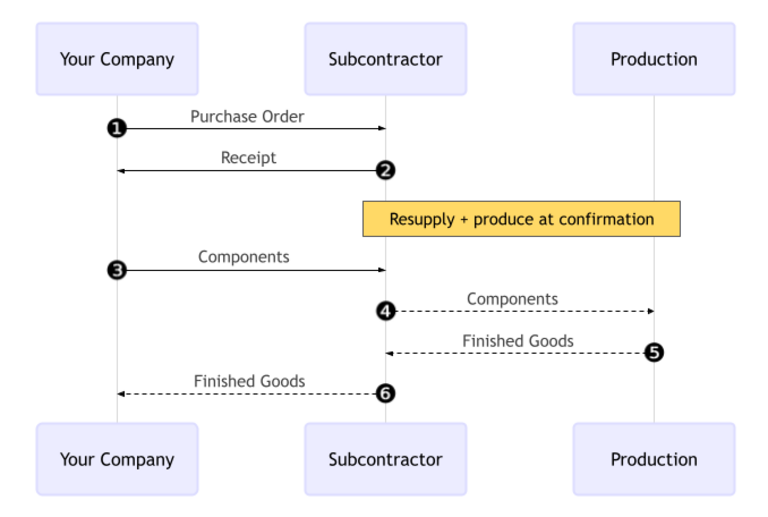
Workflow
The resupply subcontracting workflow begins by creating a PO to purchase the product from the subcontractor (1).
The company then confirms the PO, which creates both a resupply order to transfer the components and a receipt to receive the final product (2) from the subcontractor.
Next, the company validates the transfer of components to the subcontractor (3). The subcontractor begins producing the product.
Once the product has been produced and received, the company validates the receipt (6) to trigger inventory moves from the subcontractor to the company’s stock (4, 5).
Create and confirm PO
To create a PO for the subcontracted product, navigate to and click New.
Begin filling out the PO by selecting a subcontractor from the Vendor drop-down menu.
In the Products tab, click Add a product and select the subcontracted product. Next, enter the Quantity in the corresponding field.
After adding the product, the Expected Arrival field is updated with the finished product’s expected delivery date, as configured earlier with the vendor Lead Time.
Finally, click Confirm Order to confirm the PO. A receipt and a resupply order are automatically created, accessible via the Receipt and Resupply smart buttons at the top of the form.
Validate resupply order
Click the Resupply smart button at the top of the PO to open the resupply order, and click Validate to confirm that the components have been sent to the subcontractor.
Alternatively, open the Inventory app, and on the Resupply Subcontractor card, click the (#) To Process button. Select the relevant resupply order, then click Validate to confirm that the components have been sent to the subcontractor.
Process receipt
After the resupply order is confirmed, the subcontractor manufactures the product and delivers the finished good back to the company.
To receive the finished product from the subcontractor, click the Receive Products button on the PO, or click the Receipt smart button at the top of the page. Then, click Validate to enter the incoming shipment into inventory.
Note
If multi-step inventory flows are enabled, additional transfers must be validated to enter the incoming product into stock.
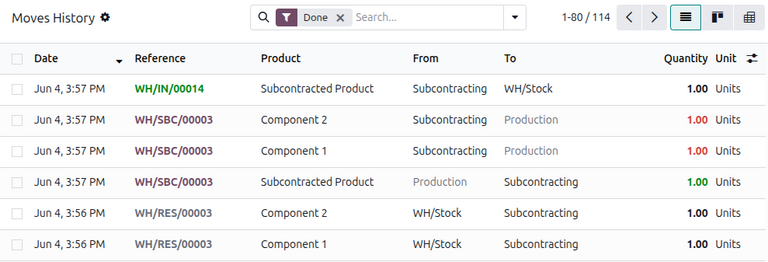
Track inventory moves
After validating the receipt, NightPOS automatically generates inventory moves to track the movement of subcontracted products between locations. To view these inventory moves, navigate to .
In resupply subcontracting, NightPOS first transfers any product components to a dedicated location called Subcontracting. Another location called Production then consumes the components and produces the finished good. Once produced, the good then moves back to the Subcontracting location before finally entering the company’s stock when the receipt is validated.