Connect Gmail to NightPOS using Google OAuth
NightPOS is compatible with Google's OAuth for Gmail. In order to send secure emails from a custom domain, all that is required is to configure a few settings on Google's Workspace platform, as well as on the back end of the NightPOS database. This configuration works by using either a personal email address or an address created by a custom domain.
Tip
หากต้องการข้อมูลเพิ่มเติม โปรดไปที่ Google's documentation เกี่ยวกับการตั้งค่า OAuth
ตั้งค่าใน Google
สร้างโปรเจ็กต์ใหม่
To get started, go to the Google API Console. Log in with your Google Workspace account if you have one, otherwise log in with your personal Gmail account (this should match the email address you want to configure in NightPOS).
หลังจากนั้น คลิก สร้างโปรเจ็กต์ ซึ่งอยู่ทางด้านขวาสุดของ หน้าจอยินยอม OAuth หากมีการสร้างโปรเจ็กต์ในบัญชีนี้แล้ว ตัวเลือก โปรเจ็กต์ใหม่ จะอยู่ที่มุมขวาบนใต้เมนูแบบเลื่อนลง เลือกโปรเจ็กต์
On the screen, rename the Project name to NightPOS and
browse for the Location. Set the Location as the Google Workspace
organization. If you are using a personal Gmail account, then leave the Location as
No Organization.
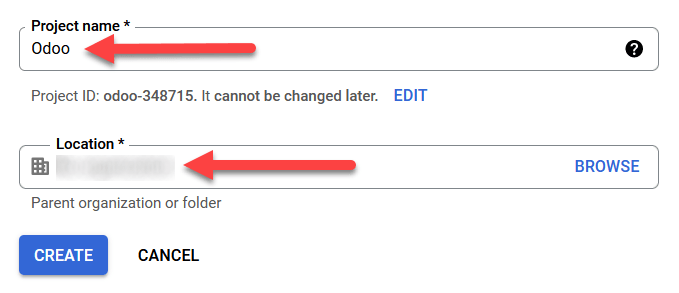
คลิกที่ สร้าง เพื่อเสร็จสิ้นขั้นตอนนี้
หน้าจอยินยอม OAuth
หากหน้าเว็บไม่เปลี่ยนเส้นทางไปยังตัวเลือก ให้คลิกที่ หน้าจอยินยอม OAuth ในเมนูด้านซ้าย
ใต้ตัวเลือก ประเภทผู้ใช้ ให้เลือก ประเภทผู้ใช้ ที่เหมาะสม จากนั้นคลิกที่ สร้าง อีกครั้ง ซึ่งในที่สุดจะนำทางไปยังหน้า
Warning
บัญชี Gmail ส่วนตัว อนุญาตให้เป็นประเภทผู้ใช้ ภายนอก เท่านั้น ซึ่งหมายความว่า Google อาจต้องได้รับการอนุมัติหรือต้องเพิ่ม ขอบเขต อย่างไรก็ตาม การใช้บัญชี Google WorkSpace จะอนุญาตให้ใช้ประเภทผู้ใช้ ภายใน ได้
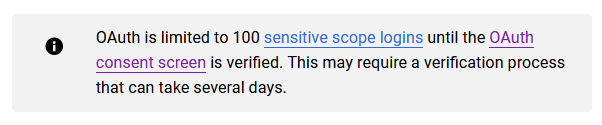
โปรดทราบว่าแม้ว่าการเชื่อมต่อ API จะอยู่ในโหมดการทดสอบ ภายนอก ก็ไม่จำเป็นต้องได้รับการอนุมัติจาก Google ขีดจำกัดผู้ใช้ในโหมดการทดสอบนี้ตั้งไว้ที่ผู้ใช้ 100 คน
แก้ไขการลงทะเบียนแอป
ต่อไปเราจะกำหนดค่าการลงทะเบียนแอปโปรเจ็กต์
On the OAuth consent screen step, under the App information section, enter
NightPOS in the App name field. Select the organization's email address under the
User support email field.
Next, under , click on Add Domain and
enter nightpos.com.
หลังจากนั้น ใต้ส่วน ข้อมูลติดต่อของนักพัฒนา ให้ป้อนที่อยู่อีเมลขององค์กร Google ใช้ที่อยู่อีเมลนี้เพื่อแจ้งองค์กรเกี่ยวกับการเปลี่ยนแปลงในโปรเจ็กต์ของคุณ
จากนั้นคลิกที่ปุ่ม บันทึกและดำเนินการต่อ จากนั้น ข้ามหน้า โดยเลื่อนไปที่ด้านล่างและคลิกที่ บันทึกและดำเนินการต่อ
หากดำเนินการต่อในโหมดการทดสอบ (ภายนอก) ให้เพิ่มที่อยู่อีเมลที่ได้รับการกำหนดค่าภายใต้ขั้นตอน ทดสอบผู้ใช้ โดยคลิกที่ เพิ่มผู้ใช้ จากนั้นคลิกปุ่ม บันทึกและดำเนินการต่อ สรุปการลงทะเบียนแอปจะปรากฏขึ้น
สุดท้าย เลื่อนไปที่ด้านล่างและคลิกที่ กลับไปที่แดชบอร์ด เพื่อสิ้นสุดการตั้งค่าโปรเจ็กต์
สร้างข้อมูลรับรอง
เมื่อตั้งค่าโปรเจ็กต์แล้ว ควรสร้างข้อมูลรับรองซึ่งรวมถึง ID ลูกค้า และ รหัสลูกค้า ขั้นแรก คลิกที่ ข้อมูลรับรอง ในเมนูแถบด้านข้างซ้าย
จากนั้น คลิก สร้างข้อมูลรับรอง ในเมนูด้านบน และเลือก รหัสลูกค้า OAuth จากเมนูแบบเลื่อนลง
ใต้ ประเภทการสมัคร ให้เลือก แอปพลิเคชันเว็บ จากเมนูแบบเลื่อนลง
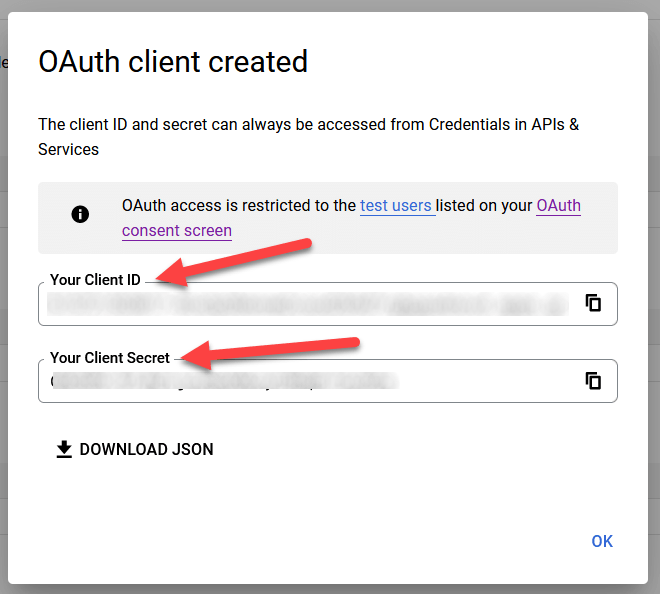
In the Name field, enter
NightPOS.Under the Authorized redirect URIs label, click the button ADD URI, and then input
https://yourdbname.nightpos.com/google_gmail/confirmin the URIs 1 field. Be sure to replace the yourdbname part of the URL with the actual NightPOS database name.Next, click on Create to generate an OAuth Client ID and Client Secret. Finally, copy each generated value for later use when configuring in NightPOS, and then navigate to the NightPOS database.
Setup in NightPOS
ป้อนข้อมูลประจำตัวของ Google
First, open NightPOS and navigate to the Apps module. Then, remove the Apps
filter from the search bar and type in Google. Install the module called Google
Gmail.
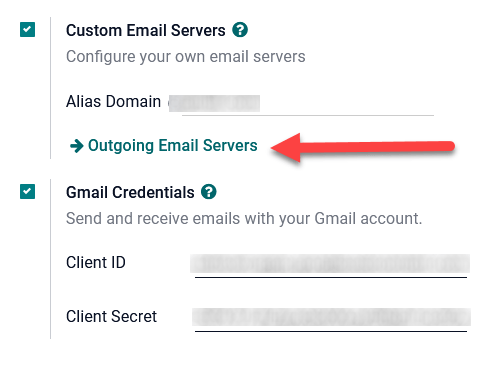
จากนั้น ไปที่ และภายใต้ส่วน แชท ตรวจสอบให้แน่ใจว่าช่องทำเครื่องหมายสำหรับ เซิร์ฟเวอร์อีเมลแบบกำหนดเอง หรือ เซิร์ฟเวอร์อีเมลภายนอก คือ ตรวจสอบแล้ว สิ่งนี้จะเติมตัวเลือกใหม่สำหรับ ข้อมูลรับรอง Gmail หรือ ใช้เซิร์ฟเวอร์ Gmail จากนั้น คัดลอกและวางค่าที่เกี่ยวข้องลงในฟิลด์ รหัสลูกค้า และ รหัสลับลูกค้า และ บันทึก การตั้งค่า
กำหนดค่าเซิร์ฟเวอร์อีเมลขาออก
หากต้องการกำหนดค่าบัญชี Gmail ภายนอก ให้กลับไปที่ด้านบนของการตั้งค่า เซิร์ฟเวอร์อีเมลแบบกำหนดเอง จากนั้นคลิกลิงก์ เซิร์ฟเวอร์อีเมลขาออก
จากนั้น คลิก ใหม่ หรือ สร้าง เพื่อสร้างเซิร์ฟเวอร์อีเมลใหม่ และกรอก ชื่อ, คำอธิบาย และอีเมล :guilabel:`ชื่อผู้ใช้ ` (ถ้าจำเป็น)
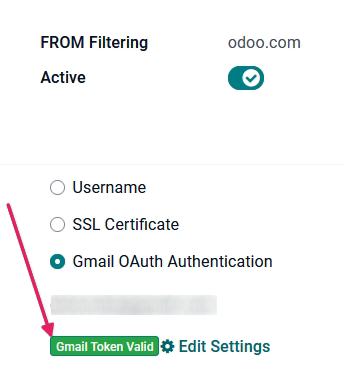
จากนั้น คลิก การตรวจสอบสิทธิ์ OAuth ของ Gmail หรือ Gmail (ใต้ส่วน Authenticate with หรือ การเชื่อมต่อ) สุดท้าย คลิกที่ เชื่อมต่อบัญชี Gmail ของคุณ
A new window labeled Google opens to complete the authorization process. Select the appropriate email address that is being configured in NightPOS.
If the email address is a personal account, then an extra step pops up, so click Continue to allow the verification and connect the Gmail account to NightPOS.
Then, allow NightPOS to access the Google account by clicking on Continue or Allow. After that, the page navigates back to the newly configured outgoing email server in NightPOS. The configuration automatically loads the token in NightPOS, and a tag stating Gmail Token Valid appears in green.
Finally, Test the Connection. A confirmation message should appear. The NightPOS database can now send safe, secure emails through Google using OAuth authentication.
Google OAuth FAQ
สถานะการผลิต VS สถานะการเผยแพร่การทดสอบ
การเลือก การผลิต เป็น สถานะการเผยแพร่ (แทน การทดสอบ) จะแสดงข้อความเตือนต่อไปนี้:
หากต้องการแก้ไขคำเตือนนี้ ให้ไปที่ แพลตฟอร์ม Google API หาก สถานะการเผยแพร่ คือ อยู่ในการผลิต ให้คลิก กลับไปที่การทดสอบ เพื่อแก้ไขปัญหา
ไม่มีการเพิ่มผู้ใช้ทดสอบ
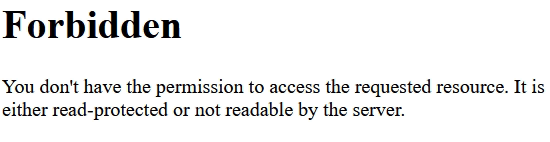
หากไม่มีการเพิ่มผู้ใช้ทดสอบลงในหน้าจอยินยอม OAuth ข้อผิดพลาด 403 จะถูกปฏิเสธการเข้าถึง

To correct this error, return to the OAuth consent screen under APIs & Services and add test user(s) to the app. Add the email that you are configuring in NightPOS.
โมดูล Gmail ไม่ได้อัปเดต
If the Google Gmail module in NightPOS has not been updated to the latest version, then a Forbidden error message populates.
หากต้องการแก้ไขข้อผิดพลาดนี้ ให้ไปที่โมดูล และล้างคำค้นหาออก จากนั้น ค้นหา Gmail หรือ Google และอัปเกรดโมดูล Google Gmail สุดท้าย คลิกที่จุดสามจุดที่มุมขวาบนของโมดูล และเลือก อัปเกรด
ประเภทแอปพลิเคชัน
เมื่อสร้างข้อมูลรับรอง (OAuth รหัสลูกค้า และ รหัสลับลูกค้า) หากเลือก แอปเดสก์ท็อป สำหรับ ประเภทแอปพลิเคชัน แล้ว ข้อผิดพลาดในการอนุญาต จะแสดงขึ้น
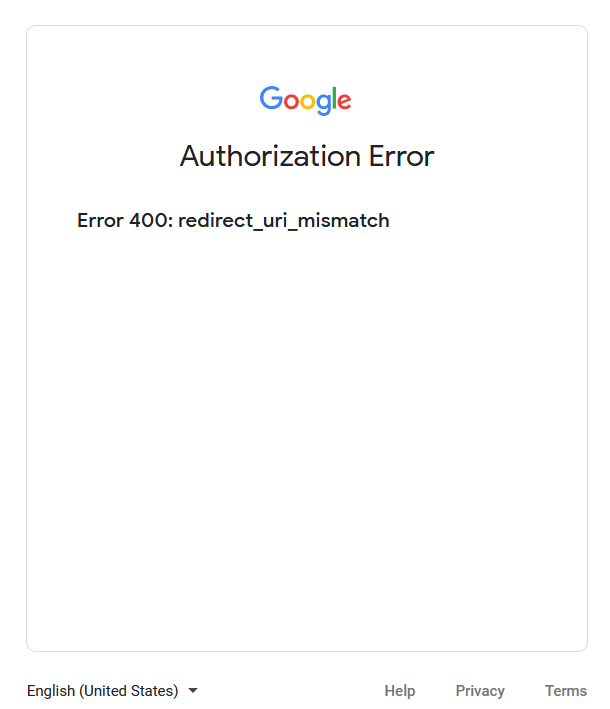
To correct this error, delete the credentials already created and create new credentials, selecting
Web Application for the Application Type. Then, under Authorized
redirect URIs, click ADD URI and type:
https://yourdbname.nightpos.com/google_gmail/confirm in the field, being sure to replace yourdbname
in the URL with the NightPOS database name.