สร้างโอกาสจากแบบฟอร์มติดต่อบนเว็บ
การเพิ่มแบบฟอร์มติดต่อลงในเว็บไซต์ทำให้สามารถแปลงผู้เยี่ยมชมให้เป็นลูกค้าเป้าหมายและโอกาสได้อย่างง่ายดาย หลังจากที่ผู้เยี่ยมชมส่งข้อมูลของตน โอกาสสามารถถูกสร้างขึ้นโดยอัตโนมัติและมอบหมายให้กับทีมการขายและพนักงานขายที่กำหนดไว้
ปรับแต่งแบบฟอร์มติดต่อ
By default, the Contact Us page on an NightPOS website displays a preconfigured contact form. This form can be customized, as needed, to suit the needs of a specific sales team.
ไปที่ จากนั้นคลิก แก้ไข ที่ด้านบนขวาของหน้าจอเพื่อเปิดโปรแกรมแก้ไขเว็บ คลิกที่บล็อกการสร้างแบบฟอร์มในเนื้อหาของเว็บเพจเพื่อเปิดการตั้งค่าการกำหนดค่าแบบฟอร์มในแถบด้านข้างทางขวา ตัวเลือกต่อไปนี้พร้อมใช้งานเพื่อปรับแต่งแบบฟอร์มการติดต่อจากส่วน จาก ในแถบด้านข้างทางขวา:
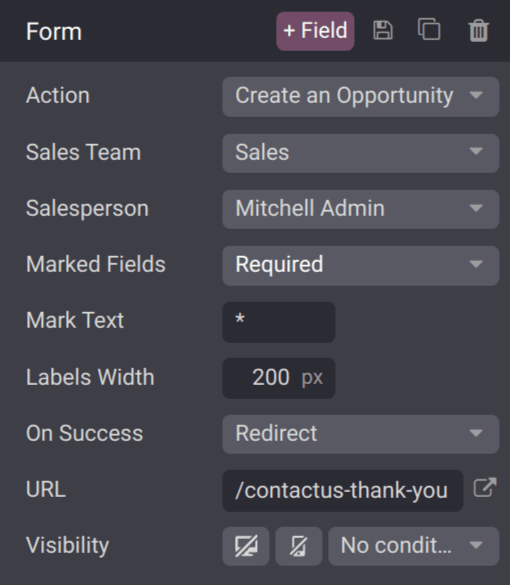
Action: การดำเนินการเริ่มต้นสำหรับแบบฟอร์มติดต่อคือ Send an Email เลือก Create an Opportunity จากรายการแบบเลื่อนลงเพื่อบันทึกข้อมูลในแอป ลูกค้าสัมพันธ์
Sales Team: เลือกทีมการขายจากเมนูแบบเลื่อนลงที่โอกาสจากแบบฟอร์มนี้ควรถูกมอบหมายให้ ฟิลด์นี้จะปรากฏ**เฉพาะ**เมื่อฟิลด์ Action ถูกตั้งค่าเป็น Create an Opportunity
Salesperson: หากโอกาสควรถูกมอบหมายให้กับพนักงานขายที่เฉพาะเจาะจง ให้เลือกจากเมนูแบบเลื่อนลง หากไม่มีการเลือกในฟิลด์นี้ โอกาสจะถูกมอบหมายตามกฎที่มีอยู่ของทีม
Marked Fields: ใช้ฟิลด์นี้เพื่อเปลี่ยนวิธีที่แบบฟอร์มจัดการกับฟิลด์ที่ทำเครื่องหมาย ตัวเลือกเริ่มต้นคือการปฏิบัติต่อฟิลด์ที่ทำเครื่องหมายเป็น Required ซึ่งเป็นการตั้งค่าที่แนะนำ
Mark Text: เลือกวิธีการระบุ Marked Fields อักขระเริ่มต้นคือเครื่องหมายดอกจัน (
*)Labels Width: ใช้ฟิลด์นี้เพื่อเปลี่ยนความกว้างของป้ายกำกับเป็นพิกเซลตามต้องการ
เกี่ยวกับความสำเร็จ: เลือกว่าหน้าเว็บจะตอบสนองอย่างไรหลังจากที่ลูกค้าส่งแบบฟอร์มเรียบร้อยแล้ว ไม่มีอะไร ช่วยให้ลูกค้าอยู่ในหน้าจอเดียวกัน พร้อมด้วยข้อความยืนยันว่าส่งแบบฟอร์มสำเร็จแล้ว รีไดเรก จะส่งลูกค้าไปยังหน้าเว็บใหม่ ตามที่อยู่ที่ระบุไว้ในช่อง URL ด้านล่าง แสดงข้อความ แทนที่แบบฟอร์มด้วยข้อความที่กำหนดค่าล่วงหน้าซึ่งแจ้งให้ลูกค้าทราบว่าควรตอบกลับโดยเร็วที่สุด
URL: หาก Redirect ถูกเลือกในฟิลด์ On Success ให้ป้อน URL สำหรับหน้าเว็บที่ลูกค้าควรถูกนำไปหลังจากส่งแบบฟอร์มสำเร็จ
Visibility: ใช้เมนูแบบเลื่อนลงเพื่อเพิ่มเงื่อนไขการมองเห็นสำหรับฟิลด์นี้ตามต้องการ
Important
หาก ลูกค้าเป้าหมาย ถูกเปิดใช้งานในการตั้งค่า ลูกค้าสัมพันธ์ การเลือก Create an Opportunity จะสร้างลูกค้าเป้าหมายแทน หากต้องการเปิดใช้งานลูกค้าเป้าหมาย ให้ไปที่ และทำเครื่องหมายที่ช่อง Leads จากนั้นคลิก Save
ปรับแต่งฟิลด์แบบฟอร์มติดต่อ
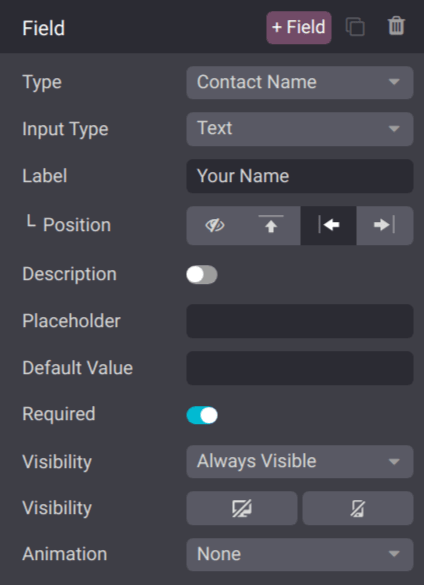
นอกจากการตั้งค่าสำหรับแบบฟอร์มแล้ว การตั้งค่าสำหรับแต่ละฟิลด์ก็สามารถปรับแต่งได้เช่นกัน โดยเมนูตัวแก้ไขเว็บยังคงเปิดอยู่ ให้คลิกเข้าไปในฟิลด์เพื่อเปิดส่วนการตั้งค่าการกำหนดค่า Field บนแถบด้านข้าง ตัวเลือกต่อไปนี้สามารถใช้เพื่อปรับแต่งฟิลด์:
Type: เลือกตัวเลือกฟิลด์ที่กำหนดเองหรือประเภทฟิลด์ที่มีอยู่
Input Type: กำหนดประเภทของข้อมูลที่ลูกค้าควรป้อน ตัวเลือกที่มีคือ Text, Email, Telephone หรือ Url การเลือกในฟิลด์นี้จะจำกัดรูปแบบที่ลูกค้าสามารถใช้เมื่อป้อนข้อมูล
Label: ป้อนชื่อสำหรับฟิลด์
Position: เลือกวิธีการจัดแนวป้ายกำกับกับส่วนที่เหลือของแบบฟอร์ม ป้ายกำกับสามารถซ่อน อยู่เหนือฟิลด์ อยู่ทางซ้ายของฟิลด์ หรือจัดชิดขวาและใกล้กับฟิลด์ได้
Description: slide the toggle to add a description for the field, which can provide additional instructions to customers. Click under the field on the form to add the description.
Placeholder: enter an example to help users know how to input information where formatting is important, such as a phone number or email address.
Default Value: enter a value to include in the form, by default, if the customer does not provide information in the field. It is not recommended to include a default value for required fields.
Required: slide the toggle to mark this field as required if it must be filled in for every submission.
Visibility: select when this field should be visible. Use the button on the left to choose whether to show or hide this field on a desktop users. Use the button on the right to choose whether to show or hide this field to mobile users.
Animation: select if this field should have any animation.
View opportunities
After a customer submits a contact form, and an opportunity is created, it is assigned based on the form settings. To view opportunities, navigate to .
Note
If leads are activated on the database, contact form submissions are generated as leads, not opportunities. To activate leads, navigate to , and tick the Leads checkbox. Then, click Save.
Navigate to to view the newly-created leads.
On the My Pipeline dashboard, click on an opportunity card in the Kanban view to open the opportunity record. The information submitted by the customer is visible on the opportunity record.
Note
As the contact form fields are customizable, the fields on the opportunity record, where the form information is stored, varies accordingly.
If the preconfigured contact form is used, the Subject field is added to the Title field, and the content in the Notes field, which is labeled as Your Question, is added to the Internal Notes tab.