ผู้ใช้
NightPOS defines a user as someone who has access to a database. An administrator can add as many users as the company needs and, in order to restrict the type of information each user can access, rules can be applied to each user. Users and access rights can be added and changed at any point.
เพิ่มผู้ใช้รายบุคคล
หากต้องการเพิ่มผู้ใช้ใหม่ ให้ไปที่ แล้วคลิกที่ สร้าง
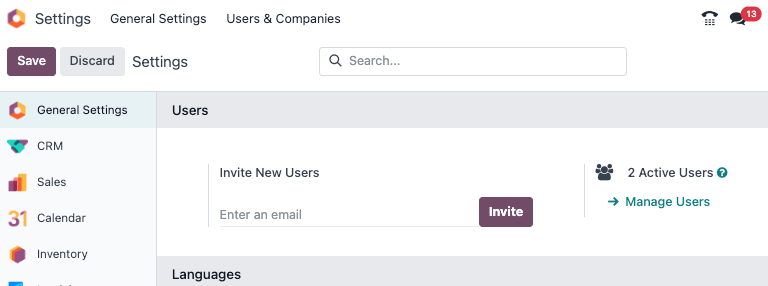
กรอกข้อมูลที่จำเป็นทั้งหมดลงในแบบฟอร์ม ภายใต้แท็บ สิทธิ์การเข้าถึง ให้เลือกกลุ่มภายในแต่ละแอปพลิเคชันที่ผู้ใช้สามารถเข้าถึงได้
รายการแอปพลิเคชันที่แสดงจะขึ้นอยู่กับแอปพลิเคชันที่ติดตั้งอยู่ในฐานข้อมูล
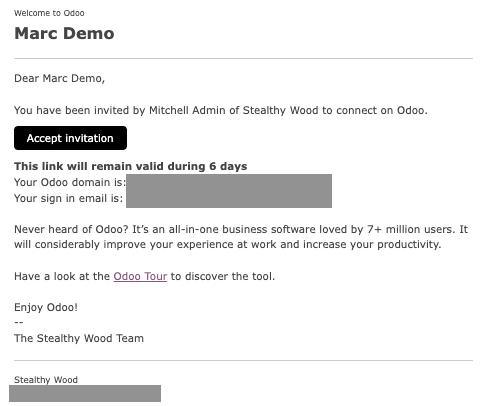
หลังจากกรอกข้อมูลที่จำเป็นทั้งหมดในหน้านี้แล้ว (บันทึกด้วยตนเอง) อีเมลเชิญจะถูกส่งไปยังผู้ใช้โดยอัตโนมัติโดยใช้อีเมลในช่อง ที่อยู่อีเมล ผู้ใช้ต้องคลิกลิงก์ที่รวมอยู่ในอีเมลเพื่อยอมรับคำเชิญและสร้างการเข้าสู่ระบบฐานข้อมูล
Warning
If the company is on a monthly subscription plan, the database automatically updates to reflect the added users. If the company is on a yearly or multi-year plan, an expiration banner appears in the database. An upsell quotation can be created by clicking the banner to update the subscription. Alternatively, send a support ticket to resolve the issue.
ประเภทผู้ใช้
ประเภทผู้ใช้ สามารถเลือกได้ในหน้า จัดการผู้ใช้ โดยคลิกที่แถบค้นหา จากนั้น ตั้งค่าตัวกรอง สำหรับ ผู้ใช้ภายใน หรือ ผู้ใช้พอร์ทัล
NightPOS databases have three types of users: Internal User, Portal, and Public. Users are considered internal database users. Portal users are external users, who only have access to the database portal to view records. Public users are those visiting websites, via the website's frontend. See the documentation on พอร์ทัลผู้ใช้.
The Portal user option does not allow the administrator to choose access rights. These users have specific access rights pre-set (such as, record rules and restricted menus), and usually do not belong to the usual NightPOS groups.
อุปกรณ์ผู้ใช้
เพื่อความปลอดภัย เมื่อผู้ใช้เข้าสู่ระบบฐานข้อมูล ข้อมูลการเข้าสู่ระบบต่างๆ เช่น ที่อยู่ IP จะถูกเก็บไว้ในโปรไฟล์ของผู้ใช้ แนวปฏิบัติที่ดีคือการตรวจสอบข้อมูลนี้เป็นระยะๆ เพื่อให้แน่ใจว่าการเข้าถึงทั้งหมดมาจากผู้ใช้และไม่มีใครอื่นเข้าถึงฐานข้อมูล
เพื่อตรวจสอบอุปกรณ์ที่เข้าสู่ระบบ ให้คลิกที่ไอคอนผู้ใช้ที่มุมขวาบน และคลิก โปรไฟล์ของฉัน ซึ่งจะเปิดโปรไฟล์ของผู้ใช้ในแอป การตั้งค่า คลิกที่แท็บ อุปกรณ์ เพื่อดูรายการแบบ Kanban ของอุปกรณ์ทั้งหมดที่ผู้ใช้เข้าสู่ระบบฐานข้อมูล อุปกรณ์ใดก็ตามที่กำลังเข้าสู่ระบบอยู่จะแสดงวงกลมสีเขียวถัดจากชื่ออุปกรณ์บนการ์ด Kanban
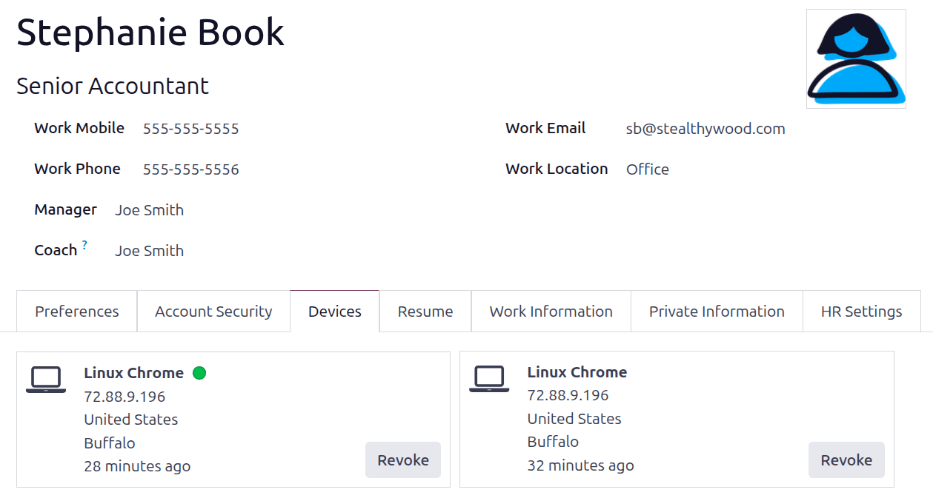
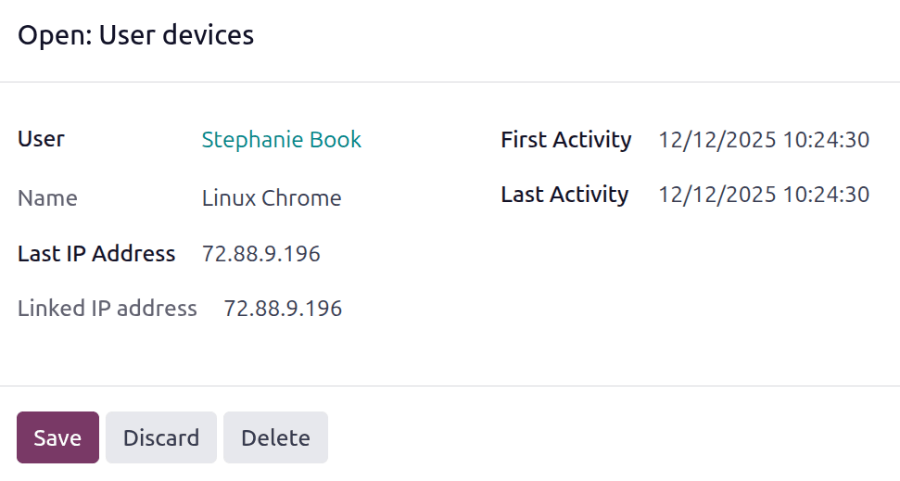
คลิกที่การ์ดเพื่อดูรายละเอียดของอุปกรณ์ การ์ดแต่ละใบจะแสดงชื่อ ผู้ใช้ ชื่อ`ของอุปกรณ์ :guilabel:`ที่อยู่ IP ล่าสุด`ที่ใช้ รวมถึง :guilabel:`ที่อยู่ IP ที่เชื่อมโยง นอกจากนี้ยังแสดง กิจกรรมแรก และ กิจกรรมล่าสุด ซึ่งแสดงเวลาที่อุปกรณ์เข้าสู่ระบบฐานข้อมูลครั้งแรกและครั้งล่าสุดที่มีการใช้งานในฐานข้อมูล
หากอุปกรณ์ถูกต้องและควรเก็บไว้ ให้คลิก บันทึก
หากอุปกรณ์ถูกต้องแต่**ไม่**ควรเก็บไว้และไม่ก่อให้เกิดความเสี่ยงด้านความปลอดภัย ให้คลิก ลบ
เพิกถอนอุปกรณ์
หากอุปกรณ์ที่แสดงในรายการ**ไม่ใช่**อุปกรณ์ผู้ใช้ที่ถูกต้องและอาจเป็นความเสี่ยงด้านความปลอดภัย ให้ลบอุปกรณ์และเพิกถอนการเข้าถึงโดยคลิกปุ่ม เพิกถอน
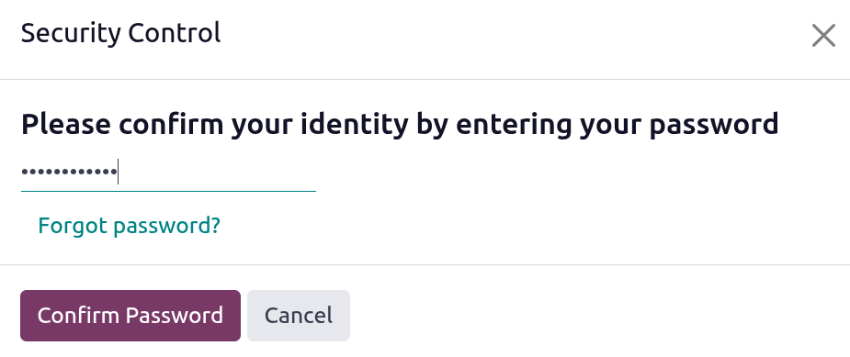
หน้าต่างป๊อปอัป การควบคุมความปลอดภัย จะโหลดขึ้นมาโดยขอให้ ยืนยันตัวตนของคุณโดยป้อนรหัสผ่าน ป้อนรหัสผ่านของผู้ใช้ จากนั้นคลิก ยืนยันรหัสผ่าน
อุปกรณ์จะหายไปจากแท็บ อุปกรณ์ และไม่สามารถใช้เพื่อเข้าสู่ระบบฐานข้อมูลได้อีกต่อไป
ปิดการใช้งานผู้ใช้
หากต้องการปิดการใช้งาน (คือเก็บถาวร) ผู้ใช้ ให้ไปที่ จากนั้นทำเครื่องหมายในช่องทางซ้ายของผู้ใช้ที่ต้องการปิดการใช้งาน
หลังจากเลือกผู้ใช้ที่ต้องการเก็บถาวรแล้ว คลิกไอคอน Actions และเลือก Archive จากเมนูแบบเลื่อนลงที่ปรากฏขึ้น จากนั้นคลิก OK จากหน้าต่างป๊อปอัป Confirmation ที่ปรากฏขึ้น
Danger
Never deactivate the main/administrator user (admin). Making changes to admin users can have a detrimental impact on the database. This includes impotent admin, which means that no user in the database can make changes to the access rights. For this reason, NightPOS recommends contacting an NightPOS Business Analyst, or our Support Team, before making changes.
ข้อผิดพลาด: มีผู้ใช้มากเกินไป
If there are more users in an NightPOS database than provisioned in the NightPOS Enterprise subscription, the following message is displayed.

เมื่อข้อความปรากฏขึ้น ผู้ดูแลระบบฐานข้อมูลมีเวลา 30 วันในการดำเนินการก่อนที่ฐานข้อมูลจะหมดอายุ การนับถอยหลังจะอัปเดตทุกวัน
หากต้องการแก้ไขปัญหา ให้ทำอย่างใดอย่างหนึ่งต่อไปนี้
เพิ่มผู้ใช้เพิ่มเติมให้กับการสมัครสมาชิกได้โดยคลิกที่ลิงก์ อัปเกรดการสมัครสมาชิกของคุณ ที่แสดงในข้อความเพื่อตรวจสอบใบเสนอราคาการขายเพิ่มเติม และชำระเงินสำหรับผู้ใช้เพิ่มเติม
ปิดใช้งานผู้ใช้ และปฏิเสธข้อเสนอการขายต่อยอด
Warning
If the company is on a monthly subscription plan, the database automatically updates to reflect the added users. If the company is on a yearly or multi-year plan, an expiration banner appears in the database. An upsell quotation can be created by clicking the banner to update the subscription. Alternatively, users can send a support ticket to resolve the issue.
เมื่อฐานข้อมูลมีจำนวนผู้ใช้ที่ถูกต้อง ข้อความการหมดอายุจะหายไปโดยอัตโนมัติภายในไม่กี่วันเมื่อมีการตรวจสอบครั้งต่อไป
การจัดการรหัสผ่าน
Password management is an important part of granting users autonomous access to the database at all times. NightPOS offers a few different methods to reset a user's password.
Tip
หากต้องการบังคับให้มีข้อกำหนดความยาวรหัสผ่านขั้นต่ำ ติดตั้ง โมดูล นโยบายรหัสผ่าน (auth_password_policy) จากนั้นเปิดแอป การตั้งค่า ไปที่ส่วน สิทธิ์ และป้อนความยาวรหัสผ่านที่ต้องการในช่อง ความยาวรหัสผ่านขั้นต่ำ ค่าเริ่มต้นคือ 8
รีเซ็ตรหัสผ่าน
Sometimes, users might wish to reset their personal password for added security, so they are the only ones with access to the password. NightPOS offers two different reset options: one initiated by the user to reset the password, and another where the administrator triggers a reset.
เปิดใช้งานการรีเซ็ตรหัสผ่านจากหน้าเข้าสู่ระบบ
คุณสามารถเปิด/ปิดการรีเซ็ตรหัสผ่านได้โดยตรงจากหน้าเข้าสู่ระบบ โดยผู้ใช้แต่ละคนจะเป็นผู้ดำเนินการนี้ และการตั้งค่านี้จะเปิดใช้งานตามค่าเริ่มต้น
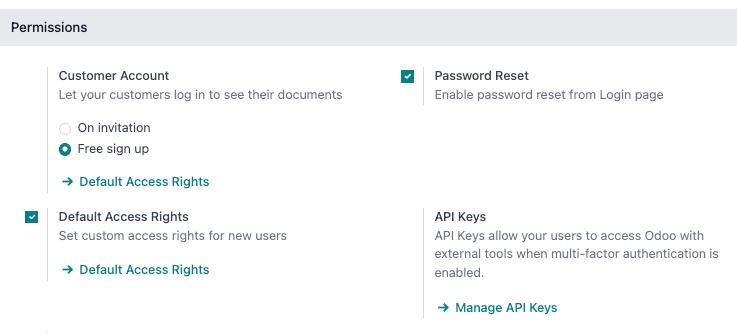
หากต้องการเปลี่ยนการตั้งค่านี้ ให้ไปที่ เปิดใช้งาน การรีเซ็ตรหัสผ่าน แล้วคลิก บันทึก
ในหน้าเข้าสู่ระบบ คลิก รีเซ็ตรหัสผ่าน เพื่อเริ่มการรีเซ็ตรหัสผ่าน และส่งโทเค็นในการรีเซ็ตไปยังอีเมลในไฟล์
ส่งคำแนะนำในการรีเซ็ต
ไปที่ เลือกผู้ใช้จากรายการ และคลิกที่ ส่งคำแนะนำการรีเซ็ตรหัสผ่าน บนแบบฟอร์มผู้ใช้ ระบบจะส่งอีเมลพร้อมคำแนะนำในการรีเซ็ตรหัสผ่านโดยอัตโนมัติ
Note
The Send Password Reset Instructions button only appears if the NightPOS invitation email has already been confirmed by the user. Otherwise, a Re-send Invitation Email button appears.
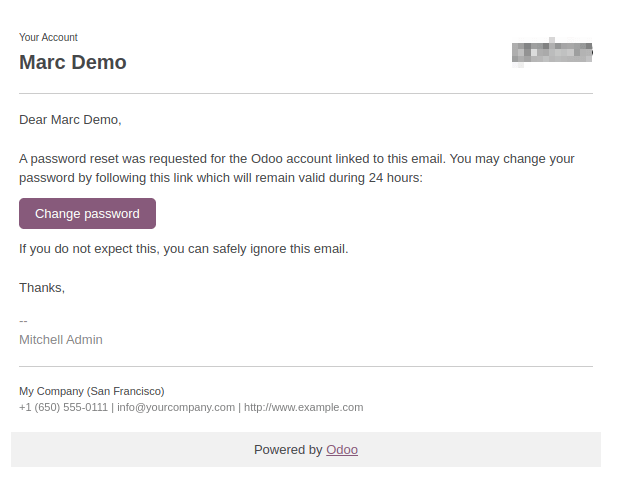
This email contains all the instructions needed to reset the password, along with a link redirecting the user to an NightPOS login page.
เปลี่ยนรหัสผ่านผู้ใช้
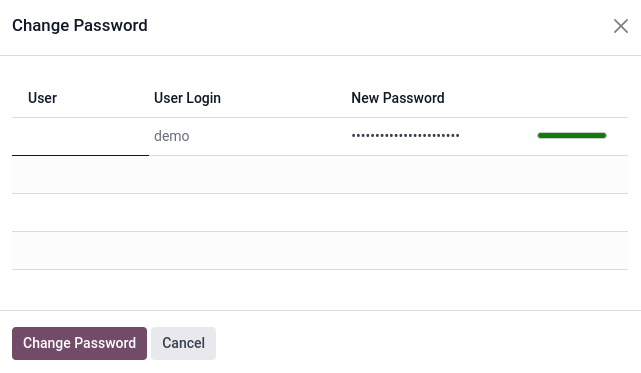
ไปที่ และเลือกผู้ใช้เพื่อเข้าถึงฟอร์มของผู้ใช้ คลิกไอคอน Actions และเลือก Change Password จากเมนูแบบเลื่อนลงที่ปรากฏขึ้น ป้อนรหัสผ่านใหม่ในคอลัมน์ New Password ของหน้าต่างป๊อปอัป Change Password ที่ปรากฏขึ้น และยืนยันการเปลี่ยนแปลงโดยคลิก Change Password
Note
This operation only modifies the password of the users locally, and does not affect their NightPOS account.
If the NightPOS password needs to be changed, use the send the password reset. NightPOS.com passwords grant access to the My Databases page, and other portal features.
After clicking Change Password, the page is redirected to an NightPOS login page where the database can be re-accessed using the new password.
หลายบริษัท
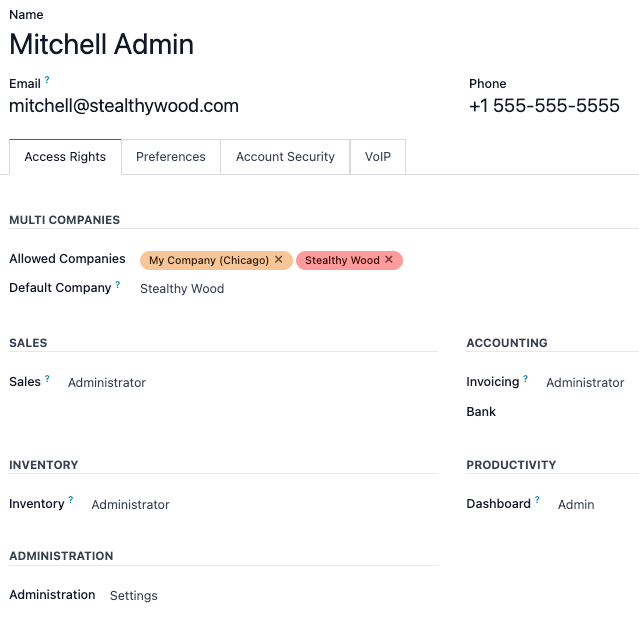
ฟิลด์ บริษัทหลายแห่ง ในแบบฟอร์มผู้ใช้ช่วยให้ผู้ดูแลระบบสามารถให้สิทธิ์การเข้าถึงบริษัทหลายแห่งแก่ผู้ใช้ได้ หากต้องการกำหนดค่าสภาพแวดล้อมที่มีบริษัทหลายแห่งสำหรับผู้ใช้ ให้ไปที่ผู้ใช้ที่ต้องการโดยไปที่: จากนั้นเลือกผู้ใช้เพื่อเปิดแบบฟอร์มผู้ใช้ และกำหนดค่าด้วยสิทธิ์การเข้าถึงหลายบริษัท
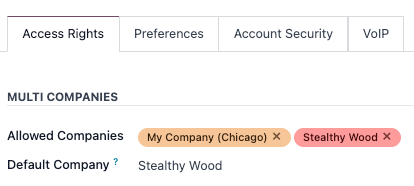
ภายใต้ บริษัทหลายบริษัท ในแท็บ สิทธิ์การเข้าถึง ให้ตั้งค่าฟิลด์ที่มีชื่อว่า บริษัทที่อนุญาต และ บริษัทเริ่มต้น
ฟิลด์ บริษัทที่ได้รับอนุญาต สามารถมีบริษัทได้หลายบริษัท บริษัทเหล่านี้คือบริษัทที่ผู้ใช้สามารถเข้าถึงและแก้ไขได้ตามสิทธิ์การเข้าถึงที่กำหนดไว้ ฟิลด์ บริษัทเริ่มต้น คือบริษัทที่ผู้ใช้ตั้งค่าเริ่มต้นเมื่อเข้าสู่ระบบในแต่ละครั้ง ฟิลด์นี้สามารถมีบริษัทได้เพียง หนึ่ง บริษัทเท่านั้น
Warning
If multi-company access is not configured correctly, it could lead to inconsistent multi-company behaviors. Because of this, only experienced NightPOS users should make access rights changes to users for databases with a multi-company configuration. For technical explanations, refer to the developer documentation on Multi-company Guidelines.
ดูเพิ่มเติม
บริษัท