การตรวจสอบสิทธิ์การลงชื่อเข้าใช้ Google
The Google Sign-In Authentication is a useful function that allows NightPOS users to sign in to their database with their Google account.
This is particularly helpful if the organization uses Google Workspace, and wants employees within the organization to connect to NightPOS using their Google Accounts.
Warning
Databases hosted on NightPOS.com should not use Oauth login for the owner or administrator of the database as it would unlink the database from their NightPOS.com account. If Oauth is set up for that user, the database will no longer be able to be duplicated, renamed or otherwise managed from the NightPOS.com portal.
การกำหนดค่า
The integration of the Google sign-in function requires configuration both on Google and NightPOS.
แผงควบคุม API ของ Google
ไปที่ แผงควบคุม Google API.
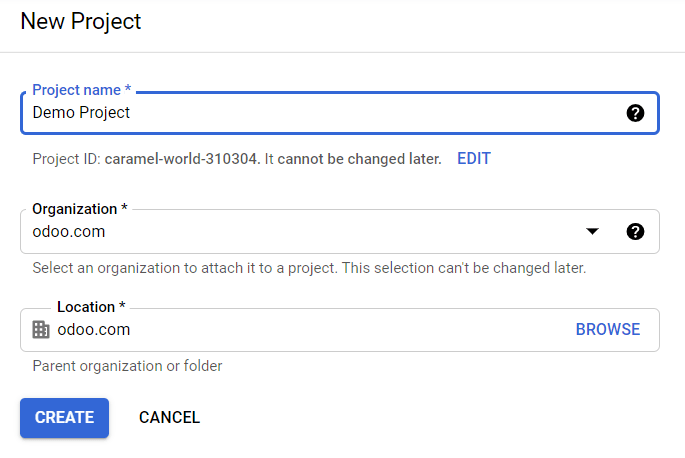
ตรวจสอบให้แน่ใจว่าเปิดโปรเจ็กต์ที่ถูกต้อง หากยังไม่มีโปรเจ็กต์ ให้คลิกที่ สร้างโปรเจ็กต์ กรอกชื่อโปรเจ็กต์และรายละเอียดอื่นๆ ของบริษัท จากนั้นคลิกที่ สร้าง
Tip
เลือกชื่อบริษัทจากเมนูแบบเลื่อนลง
หน้าจอยินยอม OAuth
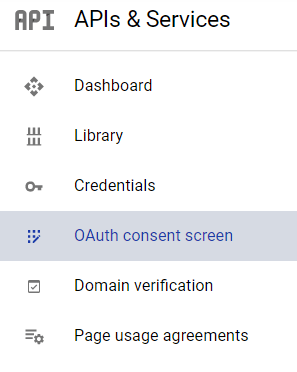
ที่เมนูทางด้านซ้าย คลิกที่
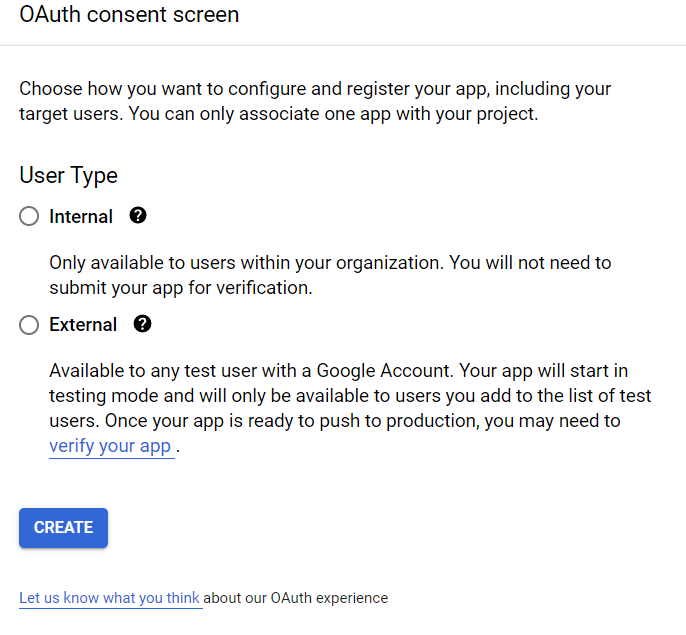
เลือกตัวเลือกใดตัวเลือกหนึ่ง (ภายใน / ภายนอก) แล้วคลิกที่ สร้าง
Warning
บัญชี Gmail ส่วนตัว อนุญาตให้เป็นประเภทผู้ใช้ ภายนอก เท่านั้น ซึ่งหมายความว่า Google อาจต้องได้รับการอนุมัติหรือต้องเพิ่ม ขอบเขต อย่างไรก็ตาม การใช้บัญชี Google WorkSpace จะอนุญาตให้ใช้ประเภทผู้ใช้ ภายใน ได้
โปรดทราบว่าแม้ว่าการเชื่อมต่อ API จะอยู่ในโหมดการทดสอบ ภายนอก ก็ไม่จำเป็นต้องได้รับการอนุมัติจาก Google ขีดจำกัดผู้ใช้ในโหมดการทดสอบนี้ตั้งไว้ที่ผู้ใช้ 100 คน
กรอกรายละเอียดที่จำเป็นและข้อมูลโดเมน จากนั้นคลิกที่ บันทึกและดำเนินการต่อ
ในหน้า ปล่อยช่องทั้งหมดไว้ตามเดิม และคลิกที่ บันทึกและดำเนินการต่อ
ขั้นตอนต่อไป หากดำเนินการต่อในโหมดทดสอบ (ภายนอก) ให้เพิ่มที่อยู่อีเมลที่ต้องการกำหนดค่าภายใต้ขั้นตอน ทดสอบผู้ใช้งาน โดยคลิกที่ เพิ่มผู้ใช้ จากนั้นคลิกปุ่ม บันทึกและดำเนินการต่อ จะปรากฏสรุปการลงทะเบียนแอป
สุดท้าย เลื่อนไปที่ด้านล่างสุดแล้วคลิกที่ กลับไปที่แดชบอร์ด
ข้อมูลประจำตัว
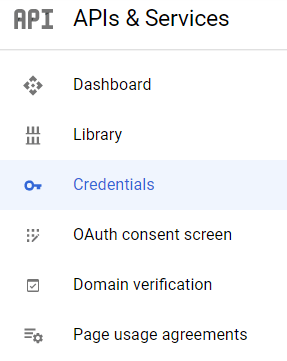
ในเมนูทางด้านซ้าย คลิกที่
คลิกที่ สร้างข้อมูลประจำตัว และเลือก ID ไคลเอนต์ OAuth

Select Web Application as the Application Type. Now, configure the allowed pages on which NightPOS will be redirected.
In order to achieve this, in the Authorized redirect URIs field, enter the database's domain immediately followed by
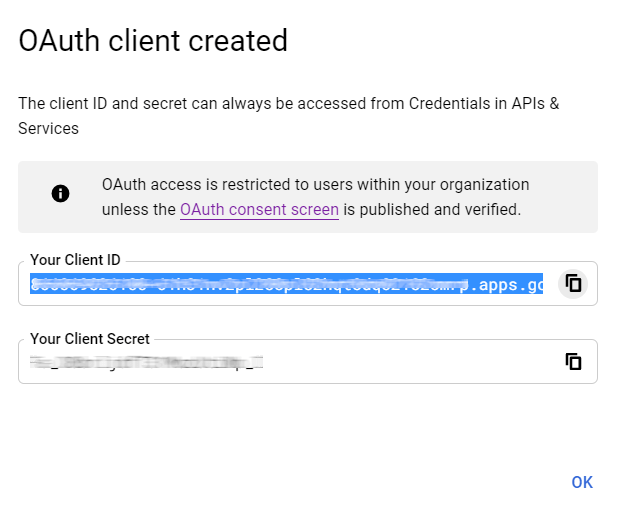
/auth_oauth/signin. For example:https://mydomain.nightpos.com/auth_oauth/signin, then click on Create.Now that the OAuth client has been created, a screen will appear with the Client ID and Client Secret. Copy the Client ID for later, as it will be necessary for the configuration in NightPOS, which will be covered in the following steps.
Google Authentication on NightPOS
ดึงข้อมูล ID ลูกค้า
เมื่อขั้นตอนก่อนหน้าเสร็จสมบูรณ์แล้ว จะมีการสร้างรหัสสองรายการบนแดชบอร์ด Google API: ID ลูกค้า และ รหัสลูกค้า คัดลอก ID ลูกค้า
NightPOS activation
Go to and activate OAuth Authentication.
Note
NightPOS may prompt the user to log-in again after this step.
กลับไปที่ เปิดใช้งานการเลือกและ บันทึก จากนั้นกลับไปที่ และเปิดใช้งานการเลือก จากนั้นกรอก ID ลูกค้า ด้วยคีย์จาก Google API Dashboard แล้ว บันทึก

Note
คุณสามารถเข้าถึงการกำหนดค่า Google OAuth2 ได้โดยการคลิกที่ ผู้ให้บริการ OAuth ภายใต้หัวข้อ OAuth Authentication ใน
Log in to NightPOS with Google
To link the Google account to the NightPOS profile, click on Log in with Google when first logging into NightPOS.
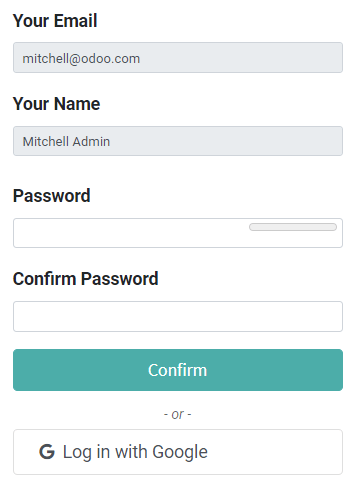
ผู้ใช้ที่มีอยู่จะต้อง รีเซ็ตรหัสผ่านของพวกเขา เพื่อเข้าถึงหน้า ในขณะที่ผู้ใช้ใหม่สามารถคลิกที่ เข้าสู่ระบบด้วย Google ได้โดยตรงแทนที่จะต้องตั้งรหัสผ่านใหม่