การตรวจสอบสิทธิ์การลงชื่อเข้าใช้ Microsoft Azure
The Microsoft Azure OAuth sign-in authentication is a useful function that allows NightPOS users to sign in to their database with their Microsoft Azure account.
This is particularly helpful if the organization uses Azure Workspace, and wants employees within the organization to connect to NightPOS using their Microsoft Accounts.
Warning
Databases hosted on NightPOS.com should not use OAuth login for the owner or administrator of the database as it would unlink the database from their NightPOS.com account. If OAuth is set up for that user, the database will no longer be able to be duplicated, renamed, or otherwise managed from the NightPOS.com portal.
การกำหนดค่า
Integrating the Microsoft sign-in function requires configuration on Microsoft and NightPOS.
NightPOS System Parameter
ขั้นแรกให้เปิดใช้งาน โหมดนักพัฒนา จากนั้นไปที่
คลิก สร้างใหม่ และในแถวว่างที่ปรากฏขึ้น ให้เพิ่มพารามิเตอร์ระบบ auth_oauth.authorization_header ลงในฟิลด์ คีย์ และตั้ง ค่า เป็น 1 จากนั้นคลิก บันทึก เพื่อเสร็จสิ้น
แดชบอร์ด Microsoft Azure
สร้างแอปพลิเคชันใหม่
Now that the system parameters in NightPOS have been set up, it's time to create a corresponding application inside of Microsoft Azure. To get started creating the new application, go to Microsoft's Azure Portal. Log in with the Microsoft Outlook Office 365 account if there is one, otherwise, log in with a personal Microsoft account.
Important
ผู้ใช้ที่มีสิทธิ์การเข้าถึงการดูแลระบบใน การตั้งค่า Azure จะต้องเชื่อมต่อและดำเนินการตามขั้นตอนการกำหนดค่าต่อไปนี้
ขั้นตอนต่อไป ให้ไปที่ส่วนที่มีชื่อว่า จัดการ Microsoft Entra ID (ชื่ออย่างเป็นทางการคือ Azure Active Directory) โดยปกติแล้วตำแหน่งของลิงก์นี้จะอยู่ตรงกลางของหน้า
Now, click on the Add (+) icon, located in the top menu, and then select App
registration from the drop-down menu. On the Register an application screen, rename the
Name field to NightPOS Login OAuth or a similarly recognizable title. Under the
Supported account types section select the option for Accounts in this
organizational directory only (Default Directory only - Single tenant).
Warning
ประเภทบัญชีที่รองรับ อาจแตกต่างกันไปขึ้นอยู่กับประเภทบัญชี Microsoft และการใช้งาน OAuth ในท้ายที่สุด ตัวอย่างเช่น การเข้าสู่ระบบมีไว้สำหรับผู้ใช้ภายในองค์กรเดียวหรือสำหรับการเข้าถึงพอร์ทัลลูกค้า การกำหนดค่าข้างต้นใช้สำหรับผู้ใช้ภายในองค์กร
เลือก บัญชี Microsoft ส่วนบุคคลเท่านั้น หากกลุ่มเป้าหมายคือผู้ใช้พอร์ทัล เลือก บัญชีในไดเร็กทอรีขององค์กรนี้เท่านั้น (ไดเร็กทอรีเริ่มต้นเท่านั้น - ผู้เช่ารายเดียว) หากกลุ่มเป้าหมายคือผู้ใช้บริษัท
Under the Redirect URL section, select Web as the platform, and then input
https://<nightpos base url>/auth_oauth/signin in the URL field. The NightPOS base URL is the canonical domain at which your NightPOS instance can be reached (e.g.
mydatabase.nightpos.com if you are hosted on NightPOS.com) in the URL field. Then, click
Register, and the application is created.
การรับรองความถูกต้อง
แก้ไขการตรวจสอบสิทธิ์ของแอปพลิเคชันใหม่โดยคลิกที่รายการเมนู การตรวจสอบสิทธิ์ ในเมนูทางด้านซ้ายหลังจากที่ถูกส่งไปที่การตั้งค่าแอปพลิเคชันจากขั้นตอนก่อนหน้า
Next, the type of tokens needed for the OAuth authentication will be chosen. These are not currency tokens but rather authentication tokens that are passed between Microsoft and NightPOS. Therefore, there is no cost for these tokens; they are used merely for authentication purposes between two APIs. Select the tokens that should be issued by the authorization endpoint by scrolling down the screen and check the boxes labeled: Access tokens (used for implicit flows) and ID tokens (used for implicit and hybrid flows).
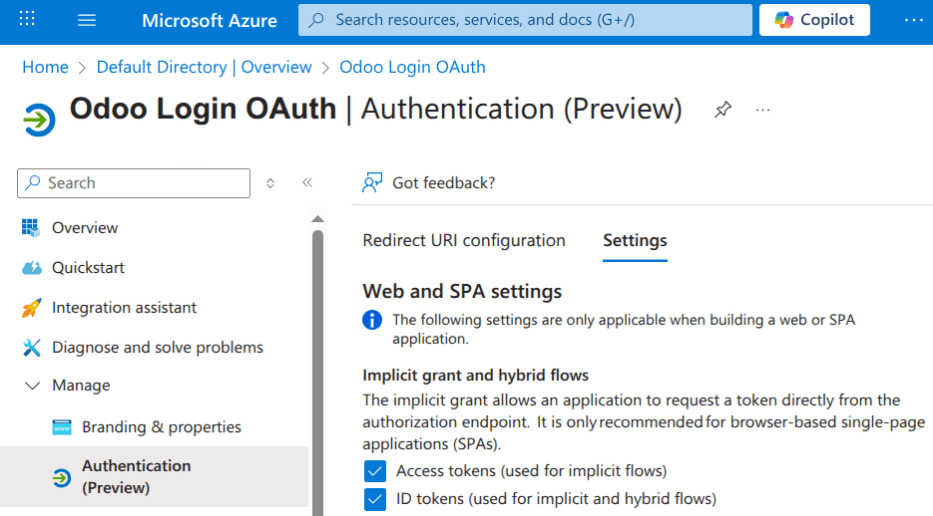
คลิก บันทึก เพื่อให้แน่ใจว่าการตั้งค่าเหล่านี้ได้รับการบันทึก
รวบรวมข้อมูลประจำตัว
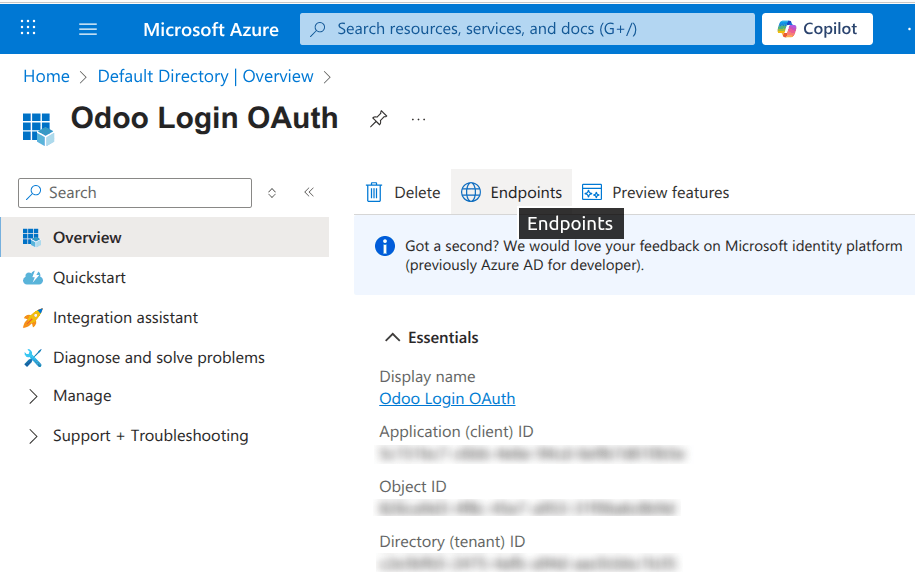
With the application created and authenticated in the Microsoft Azure console, credentials will be gathered next. To do so, click on the Overview menu item in the left-hand column. Select and copy the Application (client) ID in the window that appears. Paste this credential to a clipboard / notepad, as this credential will be used in the NightPOS configuration later.
หลังจากเสร็จสิ้นขั้นตอนนี้แล้ว ให้คลิกที่ จุดสิ้นสุด บนเมนูบนสุด และคลิกไอคอน คัดลอก ถัดจากช่อง OAuth 2.0 authorization endpoint (v2) วางค่านี้ลงในคลิปบอร์ด/แผ่นจดบันทึก
สิทธิ์ API
NightPOS needs permission to read the signed-in user's profile information from Microsoft Graph during the OAuth flow. At minimum, ensure the delegated permission User.Read is granted on the Azure app registration. Otherwise, the login process may fail or be unable to correctly link the Microsoft account to the NightPOS user.
Note
User.Read มักถูกเพิ่มโดยค่าเริ่มต้นสำหรับการลงทะเบียนแอปใหม่ แต่ควรตรวจสอบอย่างชัดเจนที่นี่
ในการกำหนดค่านี้ ให้คลิกรายการเมนู จัดการ ในคอลัมน์ด้านซ้าย จากนั้น:
คลิก สิทธิ์ API ในเมนูด้านซ้าย
คลิก (+) เพิ่มสิทธิ์
เลือก Microsoft Graph ภายใต้ Commonly Used Microsoft APIs
เลือก Delegated Permissions
ค้นหา User.Read เลือกและคลิก เพิ่มสิทธิ์
NightPOS setup
Finally, the last step in the Microsoft Azure OAuth configuration is to complete the setup in NightPOS. Navigate to and enable the checkbox for OAuth Authentication. Click Save to save the changes and refresh the page. Scroll down to the section, and click on OAuth Providers. Then click New.
ป้อน ชื่อผู้ให้บริการ เป็น Azure วาง Application (client) ID จากส่วนก่อนหน้าลงในช่อง Client ID หลังจากนั้นวางค่า OAuth 2.0 authorization endpoint (v2) ใหม่ลงในช่อง Authorization URL
สำหรับช่อง URL ข้อมูลผู้ใช้ ให้วาง URL ต่อไปนี้: https://graph.microsoft.com/oidc/userinfo
ในช่อง ขอบเขต ให้วางค่าต่อไปนี้: อีเมลโปรไฟล์ OpenID จากนั้น สามารถใช้โลโก้ Windows เป็นคลาส CSS บนหน้าจอเข้าสู่ระบบได้โดยป้อนค่าต่อไปนี้: fa fa-fw fa-windows ในช่อง CSS class
ทำเครื่องหมายในช่องข้างฟิลด์ อนุญาต เพื่อเปิดใช้งานผู้ให้บริการ OAuth สุดท้าย เพิ่ม Microsoft Azure ลงในฟิลด์ ป้ายกำกับปุ่มเข้าสู่ระบบ ข้อความนี้จะปรากฏถัดจากโลโก้ Windows บนหน้าเข้าสู่ระบบ

Save the changes to complete the OAuth authentication setup in NightPOS.
ประสบการณ์ผู้ใช้ที่ลื่นไหล
For a user to log in to NightPOS using Microsoft Azure, the user must be on the . This is the only way that NightPOS is able to link the Microsoft Azure account and allow the user to log in.
Note
Existing users must reset their password to access the . New NightPOS users must click the new user invitation link that was sent via email, then click on Microsoft Azure. Users should not set a new password.
To sign in to NightPOS for the first time using the Microsoft Azure OAuth provider, navigate to the (using the new user invitation link). A password reset page should appear. Then, click on the option labeled Microsoft Azure. The page will redirect to the Microsoft login page.
ป้อน ที่อยู่อีเมล Microsoft แล้วคลิก ถัดไป ทำตามขั้นตอนเพื่อลงชื่อเข้าใช้บัญชี หากเปิดใช้งาน 2FA แล้ว อาจต้องมีขั้นตอนเพิ่มเติม
Finally, after logging in to the account, the page will redirect to a permissions page where the user will be prompted to Accept the conditions that the NightPOS application will access their Microsoft information.