การซิงโครไนซ์ปฏิทิน Outlook
Synchronizing a user's Outlook Calendar with NightPOS is useful for keeping track of tasks and appointments across all related applications.
การตั้งค่า Microsoft Azure
To sync the Outlook Calendar with NightPOS's Calendar, a Microsoft Azure account is required. Creating an account is free for users who have never tried, or paid for, Azure. For more information, view the account options on the Azure website.
ดูที่ เอกสารประกอบของ Microsoft เกี่ยวกับวิธีการตั้งค่า Microsoft Entra ID (เดิมเรียกว่า Microsoft Azure Active Directory (Azure AD)) นี่คือคอนโซล API สำหรับจัดการและลงทะเบียนแอปพลิเคชัน Microsoft
ผู้ใช้ Microsoft Entra ID ที่มีอยู่แล้วควรเข้าสู่ระบบที่ พอร์ทัลนักพัฒนา Microsoft Azure จากนั้นเลือก ดู ภายใต้ส่วนที่มีป้ายกำกับว่า จัดการ Microsoft Entra ID
ลงทะเบียนแอปพลิเคชัน
หลังจากเข้าสู่ระบบด้วย Microsoft Entra ID แล้ว ลงทะเบียนแอปพลิเคชัน
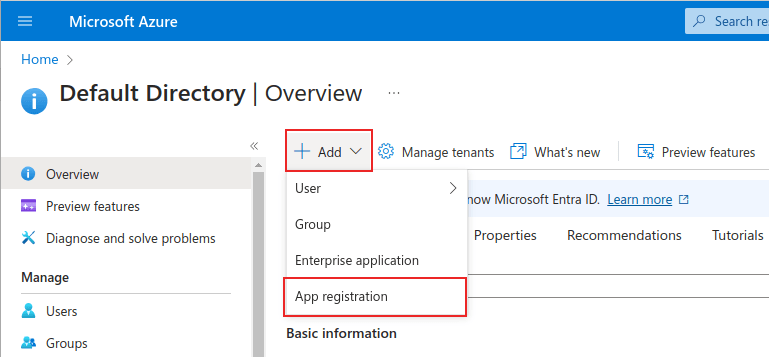
เพื่อสร้างแอปพลิเคชัน ให้คลิก + เพิ่ม ในเมนูด้านบน จากเมนูแบบเลื่อนลงที่ปรากฏขึ้น ให้เลือก การลงทะเบียนแอป
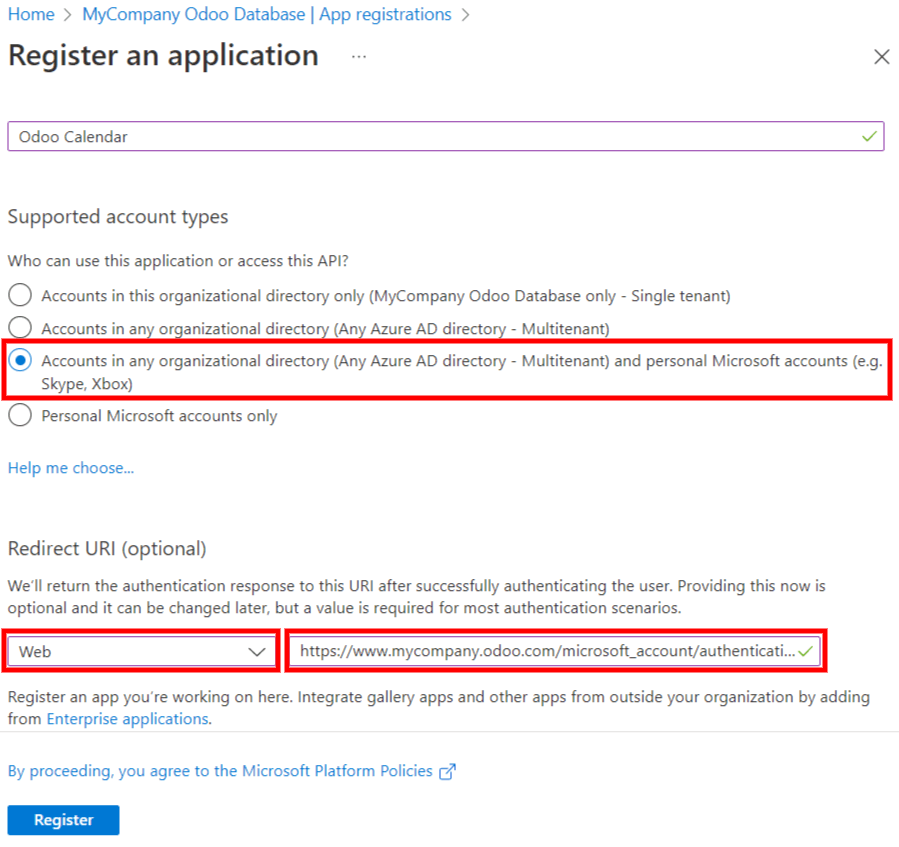
ป้อน ชื่อ ที่ไม่ซ้ำกันสำหรับแอปพลิเคชันที่เชื่อมต่อ
Choosing the appropriate Supported account type is essential, or else the connected application will not work. Users who wish to connect their Outlook Calendar to NightPOS should select the Accounts in any organizational directory (Any Microsoft Entra ID directory - Multitenant) and personal Microsoft accounts (e.g. Skype, Xbox) option for Supported account types.
When configuring the Redirect URI, choose the Web option from the first
drop-down menu. Then, enter the NightPOS database URI (URL) followed by
/microsoft_account/authentication.
Example
Enter https://yourdbname.nightpos.com/microsoft_account/authentication for the Redirect
URI. Replace yourdbname.nightpos.com with the URL.
Tip
ตรวจสอบให้แน่ใจว่า URL (โดเมน) ของฐานข้อมูลที่ใช้ใน URI เป็นโดเมนเดียวกันกับที่กำหนดค่าไว้ในพารามิเตอร์ระบบ web.base.url
เข้าถึง web.base.url โดยการเปิดใช้งาน โหมดนักพัฒนา และไปที่ จากนั้นเลือกจากรายการ คีย์ บนหน้า พารามิเตอร์ระบบ
สำหรับข้อมูลเพิ่มเติมเกี่ยวกับข้อจำกัดและข้อจำกัดของ URI โปรดตรวจสอบหน้า ข้อจำกัดและข้อจำกัดของ Redirect URI (reply URL) ของ Microsoft
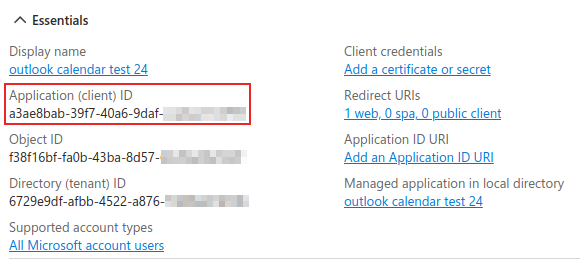
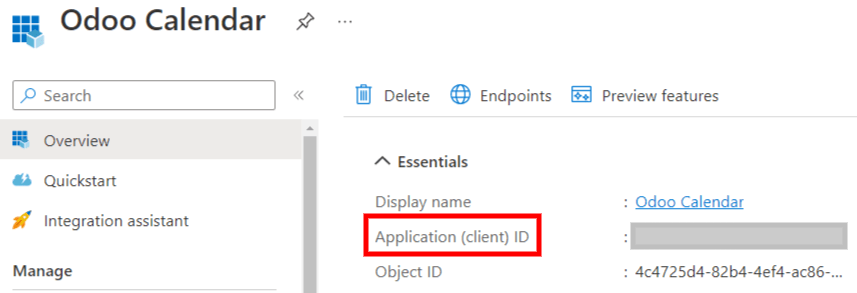
Finally, on the application registration page, click Register button to complete the application registration. The Application (client) ID is produced. Copy this value, as it is needed later, in the Configuration in NightPOS.
สร้าง Client Secret
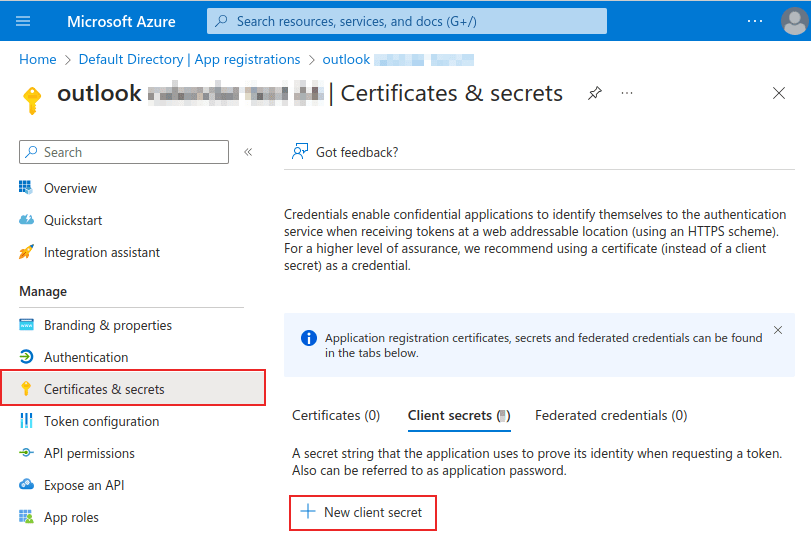
The second credential needed to complete the synchronization of the Microsoft Outlook Calendar is the Client Secret. The user must add a client secret, as this allows NightPOS to authenticate itself, requiring no interaction from the user's side. Certificates are optional.
เพื่อเพิ่ม Client Secret ให้คลิก ในเมนูด้านซ้าย จากนั้นคลิก + Client Secret ใหม่ เพื่อสร้าง Client Secret
ถัดไป ให้พิมพ์ คำอธิบาย และเลือกเวลาที่ Client Secret หายเวลา ตัวเลือกที่มีประกอบด้วย: 90 วัน (3 เดือน), 365 วัน (12 เดือน), 545 วัน (18 เดือน), 730 วัน (24 เดือน) หรือ กำหนดเอง ตัวเลือก กำหนดเอง ช่วยให้ผู้ดูแลระบบสามารถตั้งค่าวันที่ เริ่มต้น และ สิ้นสุด ได้
สุดท้าย ให้คลิก เพิ่ม เพื่อ เพิ่ม Client Secret
Tip
Since resetting the synchronization can be tricky, NightPOS recommends setting the maximum allowed expiration date for the client secret (24 months or custom), so there is no need to re-synchronize soon.
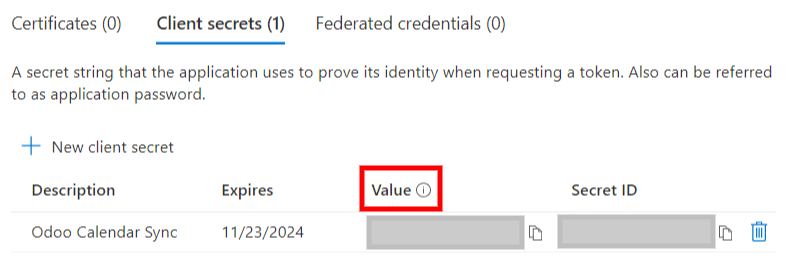
คัดลอก:guilabel:`Value`เพื่อใช้ในส่วนถัดไป
Warning
ไม่สามารถดูค่า client secret ได้ ยกเว้นทันทีหลังจากสร้างเท่านั้น โปรดบันทึก secret เมื่อสร้าง*ก่อน*ออกจากหน้า
Configuration in NightPOS
In the NightPOS database, go to , and tick the checkbox beside the Outlook Calendar setting. Remember to click Save to implement the changes.
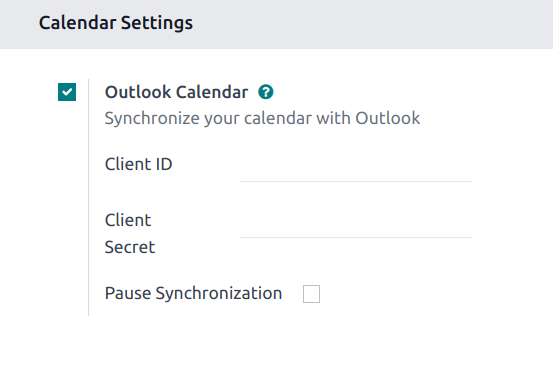
From the Microsoft Azure portal, under the Overview section of the application, copy the Application (Client) ID, if it has not already been copied, and paste it into the Client ID field in NightPOS.
Copy the previously-acquired Value (Client Secret Value), and paste it into the Client Secret field in NightPOS.
Finally, on the NightPOS page, click Save.
ซิงค์กับ Outlook
Warning
NightPOS highly recommends testing the Outlook calendar synchronization on a test database and a test email address (that is not used for any other purpose) before attempting to sync the desired Outlook Calendar with the user's production database.
If the user has any past, present, or future events on their NightPOS calendar before syncing their Outlook calendar, Outlook will treat the events pulled from NightPOS's calendar during the sync as new events, causing an email notification to be sent from Outlook to all the event attendees.
To avoid unwanted emails being sent to all past, present, and future event attendees, the user must add the events from the NightPOS calendar to the Outlook calendar before the first ever sync, delete the events from NightPOS, and then start the sync.
Even after synchronizing the NightPOS Calendar with the Outlook calendar, Outlook will still send a notification to all event participants every time an event is edited (created, deleted, unarchived, or event date/time changed), with no exceptions. This is a limitation that cannot be fixed from NightPOS's side.
In summary, once a user synchronizes their Outlook calendar with the NightPOS calendar:
Creating an event in NightPOS causes Outlook to send an invitation to all event attendees.
Deleting an event in NightPOS causes Outlook to send a cancellation to all event attendees.
Unarchiving an event in NightPOS causes Outlook to send an invitation to all event attendees.
Archiving an event in NightPOS causes Outlook to send a cancellation to all event attendees.
การเพิ่มผู้ติดต่อในอีเวนต์จะทำให้ Outlook ส่งคำเชิญไปยังผู้เข้าร่วมอีเวนต์ทั้งหมด
การลบผู้ติดต่อออกจากอีเวนต์จะทำให้ Outlook ส่งการยกเลิกไปยังผู้เข้าร่วมอีเวนต์ทั้งหมด
Sync NightPOS Calendar and Outlook
In the NightPOS database, open to the Calendar module, and click the Outlook sync button on the right-side of the page, beneath the monthly calendar.
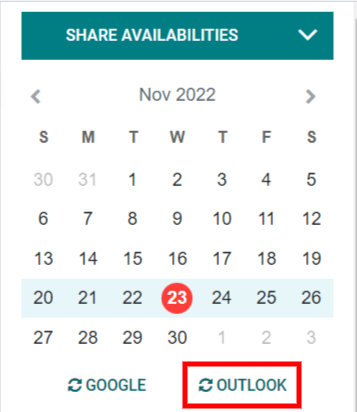
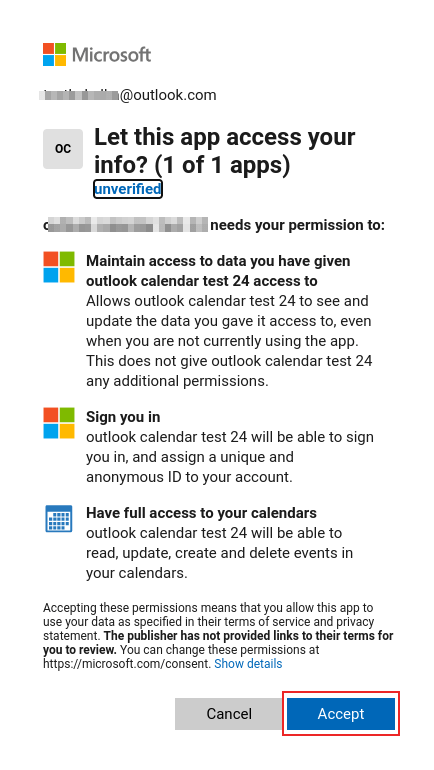
The synchronization is a two-way process, meaning that events are reconciled in both accounts (Outlook and NightPOS). The page redirects to a Microsoft login page, and the user is asked to log in to their account, if they are not already. Finally, grant the required permissions by clicking Accept.
Note
ผู้ใช้ทุกคนที่ต้องการใช้การซิงโครไนซ์จะต้อง ซิงค์ปฏิทินของตนกับ Outlook การกำหนดค่าบัญชี Azure ของ Microsoft จะทำเพียงครั้งเดียวเท่านั้น เนื่องจาก ID ไคลเอนต์และความลับของไคลเอนต์ของผู้เช่า Microsoft Entra ID นั้นไม่ซ้ำกัน และช่วยให้ผู้ใช้สามารถจัดการอินสแตนซ์เฉพาะของบริการคลาวด์ของ Microsoft สำหรับผู้ใช้ภายในและภายนอกได้
ดูเพิ่มเติม
แก้ไขปัญหาการซิงค์
There may be times when the Microsoft Outlook Calendar account does not sync correctly with NightPOS. Sync issues can be seen in the database logs.
ในกรณีเหล่านี้ บัญชีจำเป็นต้องได้รับการแก้ไขปัญหา สามารถรีเซ็ตได้โดยใช้ปุ่ม รีเซ็ตบัญชี ซึ่งสามารถเข้าถึงได้โดยไปที่ จากนั้นเลือกผู้ใช้เพื่อแก้ไขปฏิทิน และคลิกที่แท็บ ปฏิทิน
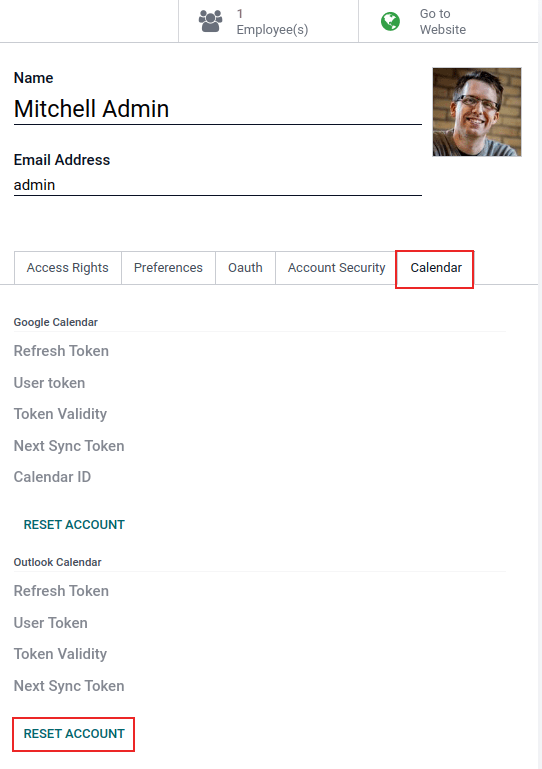
จากนั้น คลิก Reset Account ภายใต้ปฏิทินที่ถูกต้อง
ตัวเลือกการรีเซ็ต
The following reset options are available for troubleshooting Microsoft Outlook Calendar sync with NightPOS:
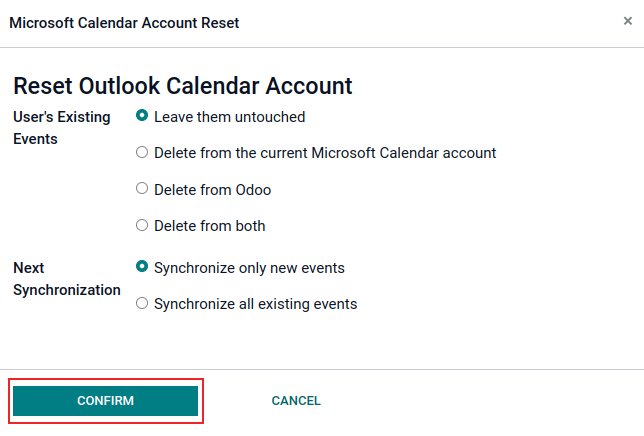
อีเวนต์ที่มีอยู่ของผู้ใช้:
ปล่อยไว้ตามเดิม: ไม่มีการเปลี่ยนแปลงอีเวนต์
ลบจากบัญชี Microsoft Calendar ปัจจุบัน: ลบอีเวนต์จาก Microsoft Outlook Calendar
Delete from NightPOS: delete the events from the NightPOS calendar.
Delete from both: delete the events from both Microsoft Outlook Calendar and NightPOS calendar.
การซิงค์ครั้งถัดไป:
Synchronize only new events: sync new events on Microsoft Outlook Calendar and/or NightPOS calendar.
Synchronize all existing events: sync all events on Microsoft Outlook Calendar and/or NightPOS calendar.
คลิก ยืนยัน หลังจากทำการเลือกเพื่อแก้ไขอีเวนต์ของผู้ใช้และการซิงโครไนซ์ปฏิทิน